
Writing A Multiplayer Text Adventure Engine In Node.js
Writing A Multiplayer Text Adventure Engine In Node.js
Fernando Doglio
Text adventures were one of the first forms of digital role-playing games out there, back when games had no graphics and all you had was your own imagination and the description you read on the black screen of your CRT monitor.
If we want to get nostalgic, maybe the name Colossal Cave Adventure (or just Adventure, as it was originally named) rings a bell. That was the very first text adventure game ever made.
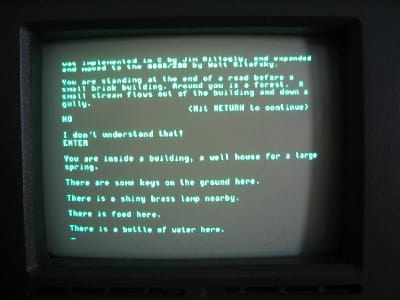
The image above is how you’d actually see the game, a far cry from our current top AAA adventure games. That being said, they were fun to play and would steal hundreds of hours of your time, as you sat in front of that text, alone, trying to figure out how to beat it.
Understandably so, text adventures have been replaced over the years by games that present better visuals (although, one could argue that a lot of them have sacrificed story for graphics) and, especially in the past few years, the increasing ability to collaborate with other friends and play together. This particular feature is one that the original text adventures lacked, and one that I want to bring back in this article.
Our Goal
The whole point of this endeavour, as you have probably guessed by now from the title of this article, is to create a text adventure engine that allows you to share the adventure with friends, enabling you to collaborate with them similarly to how you would during a Dungeons & Dragons game (in which, just like with the good ol’ text adventures, there are no graphics to look at).
In creating the engine, the chat server and the client is quite a lot of work. In this article, I’ll be showing you the design phase, explaining things like the architecture behind the engine, how the client will interact with the servers, and what the rules of this game will be.
Just to give you some visual aid of what this is going to look like, here is my goal:
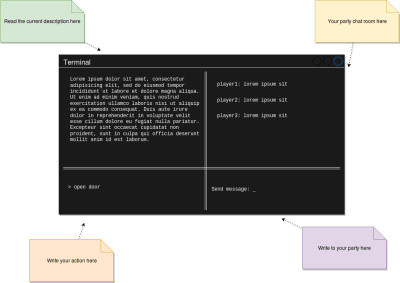
That is our goal. Once we get there, you’ll have screenshots instead of quick and dirty mockups. So, let’s get down with the process. The first thing we’ll cover is the design of the whole thing. Then, we’ll cover the most relevant tools I’ll be using to code this. Finally, I’ll show you some of the most relevant bits of code (with a link to the full repository, of course).
Hopefully, by the end, you’ll find yourself creating new text adventures to try them out with friends!
Design Phase
For the design phase, I’m going to cover our overall blueprint. I’ll try my best not to bore you to death, but at the same time, I think it’s important to show some of the behind-the-scenes stuff that needs to happen before laying down your first line of code.
The four components I want to cover here with a decent amount of detail are:
- The engine
This is going to be the main game server. The game rules will be implemented here, and it’ll provide a technologically agnostic interface for any type of client to consume. We’ll implement a terminal client, but you could do the same with a web browser client or any other type you’d like. - The chat server
Because it’s complex enough to have its own article, this service is also going to have its own module. The chat server will take care of letting players communicate with each other during the game. - The client
As stated earlier, this will be a terminal client, one that, ideally, will look similar to the mockup from earlier. It will make use of the services provided by both the engine and the chat server. - Games (JSON files)
Finally, I’ll go over the definition of the actual games. The whole point of this is to create an engine that can run any game, as long as your game file complies with the engine’s requirements. So, even though this will not require coding, I’ll explain how I’ll structure the adventure files in order to write our own adventures in the future.
The Engine
The game engine, or game server, will be a REST API and will provide all of the required functionality.
I went for a REST API simply because — for this type of game — the delay added by HTTP and its asynchronous nature will not cause any trouble. We will, however, have to go a different route for the chat server. But before we start defining endpoints for our API, we need to define what the engine will be capable of. So, let’s get to it.
| Feature | Description |
|---|---|
| Join a game | A player will be able to join a game by specifying the game’s ID. |
| Create a new game | A player can also create a new game instance. The engine should return an ID, so that others can use it to join. |
| Return scene | This feature should return the current scene where the party is located. Basically, it’ll return the description, with all of the associated information (possible actions, objects in it, etc.). |
| Interact with scene | This is going to be one of the most complex ones, because it will take a command from the client and perform that action — things like move, push, take, look, read, to name just a few. |
| Check inventory | Although this is a way to interact with the game, it does not directly relate to the scene. So, checking the inventory for each player will be considered a different action. |
A Word About Movement
We need a way to measure distances in the game because moving through the adventure is one of the core actions a player can take. We will be using this number as a measure of time, just to simplify the gameplay. Measuring time with an actual clock might not be the best, considering these type of games have turn-based actions, such as combat. Instead, we’ll use distance to measure time (meaning that a distance of 8 will require more time to traverse than one of 2, thus allowing us to do things like add effects to players that last for a set amount of “distance points”).
Another important aspect to consider about movement is that we’re not playing alone. For simplicity’s sake, the engine will not let players split the party (although that could be an interesting improvement for the future). The initial version of this module will only let everyone move wherever the majority of the party decides. So, moving will have to be done by consensus, meaning that every move action will wait for the majority of the party to request it before taking place.
Combat
Combat is another very important aspect of these types of games, and one that we’ll have to consider adding to our engine; otherwise, we’ll end up missing on some of the fun.
This is not something that needs to be reinvented, to be honest. Turn-based party combat has been around for decades, so we’ll just implement a version of that mechanic. We’ll be mixing it up with the Dungeons & Dragons concept of “initiative”, rolling a random number in order to keep the combat a bit more dynamic.
In other words, the order in which everyone involved in a fight gets to pick their action will be randomized, and that includes the enemies.
Finally (although I’ll go over this in more detail below), you’ll have items that you can pick up with a set “damage” number. These are the items you’ll be able to use during combat; anything that doesn’t have that property will cause 0 damage to your enemies. We’ll probably add a message when you try to use those objects to fight, so that you know that what you’re trying to do makes no sense.
Client-Server Interaction
Let’s see now how a given client would interact with our server using the previously defined functionality (not thinking about endpoints yet, but we’ll get there in a sec):
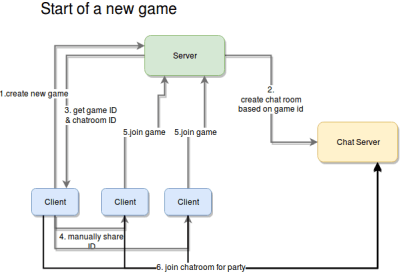
The initial interaction between the client and the server (from the point of view of the server) is the start of a new game, and the steps for it are as follows:
- Create a new game.
The client requests the creation of a new game from the server. - Create chat room.
Although the name doesn’t specify it, the server is not just creating a chatroom in the chat server, but also setting up everything it needs in order to allow a set of players to play through an adventure. - Return game’s meta data.
Once the game has been created by the server and the chat room is in place for the players, the client will need that information for subsequent requests. This will mostly be a set of IDs the clients can use to identify themselves and the current game they want to join (more on that in a second). - Manually share game ID.
This step will have to be done by the players themselves. We could come up with some sort of sharing mechanism, but I will leave that on the wish list for future improvements. - Join the game.
This one is pretty straightforward. Ince everyone has the game ID, they’ll join the adventure using their client applications. - Join their chat room.
Finally, the players’ client apps will use the game’s metadata to join their adventure’s chat room. This is the last step required pre-game. Once this is all done, then the players are ready to start adventuring!
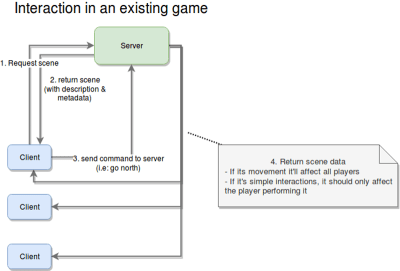
Once the prerequisites have all been met, players can start playing the adventure, sharing their thoughts through the party chat, and advancing the story. The diagram above shows the four steps required for that.
The following steps will run as part of the game loop, meaning that they will be repeated constantly until the game ends.
- Request scene.
The client app will request the metadata for the current scene. This is the first step in every iteration of the loop. - Return the meta data.
The server will, in turn, send back the metadata for the current scene. This information will include things like a general description, the objects found inside it, and how they relate to each other. - Send command.
This is where the fun begins. This is the main input from the player. It’ll contain the action they want to perform and, optionally, the target of that action (for example, blow candle, grab rock, and so on). - Return the reaction to the command sent.
This could simply be step two, but for clarity, I added it as an extra step. The main difference is that step two could be considered the beginning of this loop, whereas this one takes into account that you’re already playing, and, thus, the server needs to understand who this action is going to affect (either a single player or all players).
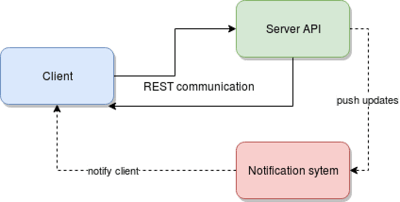
As an extra step, although not really part of the flow, the server will notify clients about status updates that are relevant to them.
The reason for this extra recurring step is because of the updates a player can receive from the actions of other players. Recall the requirement for moving from one place to another; as I said before, once the majority of the players have chosen a direction, then all players will move (no input from all players is required).
The interesting bit here is that HTTP (we’ve already mentioned that the server is going to be a REST API) does not allow for this type of behavior. So, our options are:
- perform polling every X amount of seconds from the client,
- use some sort of notification system that works in parallel with the client-server connection.
In my experience, I tend to prefer option 2. In fact, I would (and will for this article) use Redis for this kind of behavior.
The following diagram demonstrates the dependencies between services.
The Chat Server
I will leave the details of the design of this module for the development phase (which is not a part of this article). That being said, there are things we can decide.
One thing we can define is the set of the restrictions for the server, which will simplify our work down the line. And if we play our cards right, we might end up with a service that provides a robust interface, thus allowing us to, eventually, extend or even change the implementation to provide fewer restrictions without affecting the game at all.
- There will be only one room per party.
We will not let subgroups be created. This goes hand in hand with not letting the party split. Maybe once we implement that enhancement, allowing for subgroup and custom chat room creation would be a good idea. - There will be no private messages.
This is purely for simplification purposes, but having a group chat is already good enough; we don’t need private messages right now. Remember that whenever you’re working on your minimum viable product, try to avoid going down the rabbit hole of unnecessary features; it’s a dangerous path and one that is hard to get out of. - We will not persist messages.
In other words, if you leave the party, you’ll lose the messages. This will hugely simplify our task, because we won’t have to deal with any type of data storage, nor will we have to waste time deciding on the best data structure to store and recover old messages. It’ll all live in memory, and it will stay there for as long as the chat room is active. Once it’s closed, we’ll simply say goodbye to them! - Communication will be done over sockets.
Sadly, our client will have to handle a double communication channel: a RESTful one for the game engine and a socket for the chat server. This might increase the complexity of the client a bit, but at the same time, it will use the best methods of communication for every module. (There is no real point in forcing REST on our chat server or forcing sockets on our game server. That approach would increase the complexity of the server-side code, which is the one also handling the business logic, so let’s focus on that side for now.)
That’s it for the chat server. After all, it will not be complex, at least not initially. There is more to do when it’s time to start coding it, but for this article, it is more than enough information.
The Client
This is the final module that requires coding, and it is going to be our dumbest one of the lot. As a rule of thumb, I prefer to have my clients dumb and my servers smart. That way, creating new clients for the server becomes much easier.
Just so we’re on the same page, here is the high-level architecture that we should end up with.
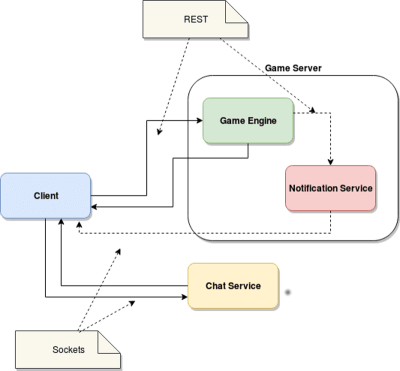
Our simple ClI client will not implement anything very complex. In fact, the most complicated bit we’ll have to tackle is the actual UI, because it’s a text-based interface.
That being said, the functionality that the client application will have to implement is as follows:
- Create a new game.
Because I want to keep things as simple as possible, this will only be done through the CLI interface. The actual UI will only be used after joining a game, which brings us to the next point. - Join an existing game.
Given the game’s code returned from the previous point, players can use it to join in. Again, this is something you should be able to do without a UI, so this functionality will be part of the process required to start using the text UI. - Parse game definition files.
We’ll discuss these in a bit, but the client should be able to understand these files in order to know what to show and know how to use that data. - Interact with the adventure.
Basically, this gives the player the ability to interact with the environment described at any given time. - Maintain an inventory for each player.
Each instance of the client will contain an in-memory list of items. This list is going to be backed up. - Support chat.
The client app needs to also connect to the chat server and log the user into the party’s chat room.
More on the client’s internal structure and design later. In the meantime, let’s finish the design stage with the last bit of preparation: the game files.
The Game: JSON Files
This is where it gets interesting because up to now, I’ve covered basic microservices definitions. Some of them might speak REST, and others might work with sockets, but in essence, they’re all the same: You define them, you code them, and they provide a service.
For this particular component, I’m not planning on coding anything, yet we need to design it. Basically, we’re implementing a sort of protocol for defining our game, the scenes inside it and everything inside them.
If you think about it, a text adventure is, at its core, basically a set of rooms connected to each other, and inside them are “things” you can interact with, all tied together with a, hopefully, decent story. Now, our engine will not take care of that last part; that part will be up to you. But for the rest, there is hope.
Now, going back to the set of interconnected rooms, that to me sounds like a graph, and if we also add the concept of distance or movement speed that I mentioned earlier, we have a weighted graph. And that is just a set of nodes that have a weight (or just a number — don’t worry about what it’s called) that represents that path between them. Here is a visual (I love learning by seeing, so just look at the image, OK?):
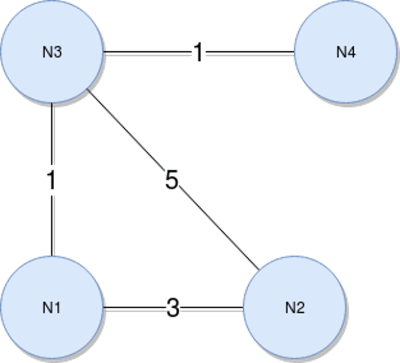
That’s a weighted graph — that’s it. And I’m sure you’ve already figured it out, but for the sake of completeness, let me show you how you would go about it once our engine is ready.
Once you start setting up the adventure, you’ll create your map (like you see on the left of the image below). And then you’ll translate that into a weighted graph, as you can see on the right of the image. Our engine will be able to pick it up and let you walk through it in the right order.
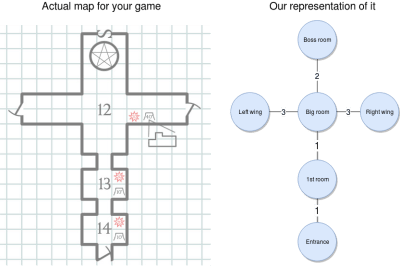
With the weighted graph above, we can make sure players can’t go from the entrance all the way to the left wing. They would have to go through the nodes in between those two, and doing so will consume time, which we can measure using the weight from the connections.
Now, onto the “fun” part. Let’s see how the graph would look like in JSON format. Bear with me here; this JSON will contain a lot of information, but I’ll go through as much of it as I can:
{ "graph": [ { "id": "entrance", "name": "Entrance", "north": { "node": "1stroom", "distance": 1 } }, { "id": "1st room", "name": "1st Room", "south": {"node": "entrance", "distance": 1} , "north": { "node": "bigroom", "distance": 1} } , { "id": "bigroom", "name": "Big room", "south": { "node": "1stroom", "distance": 1}, "north": { "node": "bossroom", "distance": 2}, "east": { "node": "rightwing", "distance": 3} , "west": { "node": "leftwing", "distance": 3} }, { "id": "bossroom", "name": "Boss room", "south": {"node": "bigroom", "distance": 2} } { "id": "leftwing", "name": "Left Wing", "east": {"node": "bigroom", "distance": 3} } { "id": "rightwing", "name": "Right Wing", "west": { "node": "bigroom", "distance": 3 } } ], "game": { "win-condition": { "source": "finalboss", "condition": { "type": "comparison", "left": "hp", "right": "0", "symbol": "<=" } }, "lose-condition": { "source": "player", "condition": { "type": "comparison", "left": "hp", "right": "0", "symbol": "<=" } } }, "rooms": { "entrance": { "description": { "default": "You're at the entrance of the dungeon. There are two lit torches on each wall (one on your right and one on your left). You see only one path: ahead." }, "items": [ { "id": "littorch1", "name": "Lit torch on the right", "triggers": [ { "action": "grab", //grab Lit torch on the right "effect":{ "statusUpdate": "has light", "target": "game", } } ] , "destination": "hand" }, { "id": "littorch2", "name": "Lit torch on the left", "triggers": [ { "action": "grab", //grab Lit torch on the left "effect":{ "statusUpdate": "has light", "target": "game", } } ] , "destination": "hand" } ] }, "1stroom": { "description": { "default": "You're in a very dark room. There are no windows and no source of light, other than the one at the entrance. You get the feeling you're not alone here.", "conditionals": { "has light": "The room you find yourself in appears to be empty, aside from a single chair in the right corner. There appears to be only one way out: deeper into the dungeon." } }, "items": [ { "id": "chair", "name": "Wooden chair", "details": "It's a wooden chair, nothing fancy about it. It appears to have been sitting here, untouched, for a while now.", "subitems": [ { "id": "woodenleg", "name": "Wooden leg", "triggeractions": [ { "action": "break", "target": "chair"}, //break - { "action": "throw", "target": "chair"} //throw
- ], "destination": "inventory", "damage": 2 } ] } ] }, "bigroom": { "description": { "default": "You've reached the big room. On every wall are torches lighting every corner. The walls are painted white, and the ceiling is tall and filled with painted white stars on a black background. There is a gateway on either side and a big, wooden double door in front of you." }, "exits": { "north": { "id": "bossdoor", "name": "Big double door", "status": "locked", "details": "A aig, wooden double door. It seems like something big usually comes through here."} }, "items": [] }, "leftwing": { "description": { "default": "Another dark room. It doesn't look like it's that big, but you can't really tell what's inside. You do, however, smell rotten meat somewhere inside.", "conditionals": { "has light": "You appear to have found the kitchen. There are tables full of meat everywhere, and a big knife sticking out of what appears to be the head of a cow." } }, "items": [ { "id": "bigknife", "name": "Big knife", "destination": "inventory", "damage": 10} ] }, "rightwing": { "description": { "default": "This appear to be some sort of office. There is a wooden desk in the middle, torches lighting every wall, and a single key resting on top of the desk." }, "items": [ { "id": "key", "name": "Golden key", "details": "A small golden key. What use could you have for it?", "destination": "inventory", "triggers": [{ "action": "use", //use
- on north exit (contextual) "target": { "room": "bigroom", "exit": "north" }, "effect": { "statusUpdate": "unlocked", "target": { "room": "bigroom", "exit": "north" } } } ] } ] }, "bossroom": { "description": { "default": "You appear to have reached the end of the dungeon. There are no exits other than the one you just came in through. The only other thing that bothers you is the hulking giant looking like it's going to kill you, standing about 10 feet from you." }, "npcs": [ { "id": "finalboss", "name": "Hulking Ogre", "details": "A huge, green, muscular giant with a single eye in the middle of his forehead. It doesn't just look bad, it also smells like hell.", "stats": { "hp": 10, "damage": 3 } } ] } } }
I know it looks like a lot, but if you boil it down to a simple description of the game, you have a dungeon comprising six rooms, each one interconnected with others, as shown in the diagram above.
Your task is to move through it and explore it. You’ll find there are two different places where you can find a weapon (either in the kitchen or in the dark room, by breaking the chair). You will also be confronted with a locked door; so, once you find the key (located inside the office-like room), you’ll be able to open it and fight the boss with whatever weapon you’ve collected.
You will either win by killing it or lose by getting killed by it.
Let’s now get into a more detailed overview of the entire JSON structure and its three sections.
Graph
This one will contain the relationship between the nodes. Basically, this section directly translates into the graph we looked at before.
The structure for this section is pretty straightforward. It’s a list of nodes, where every node comprises the following attributes:
- an ID that uniquely identifies the node among all others in the game;
- a name, which is basically a human-readable version of the ID;
- a set of links to the other nodes. This is evidenced by the existence of four possible keys: north”, south, east, and west. We could eventually add further directions by adding combinations of these four. Every link contains the ID of the related node and the distance (or weight) of that relation.
Game
This section will contain the general settings and conditions. In particular, in the example above, this section contains the win and lose conditions. In other words, with those two conditions, we’ll let the engine know when the game can end.
To keep things simple, I’ve added just two conditions:
- you either win by killing the boss,
- or lose by getting killed.
Rooms
Here is where most of the 163 lines come from, and it is the most complex of the sections. This is where we’ll describe all of the rooms in our adventure and everything inside them.
There will be a key for every room, using the ID we defined before. And every room will have a description, a list of items, a list of exits (or doors) and a list of non-playable characters (NPCs). Out of those properties, the only one that should be mandatory is the description, because that one is required for the engine to let you know what you’re seeing. The rest of them will only be there if there is something to show.
Let’s look into what these properties can do for our game.
The Description
This item is not as simple as one might think, because your view of a room can change depending on different circumstances. If, for example, you look at the description of the first room, you’ll notice that, by default, you can’t see anything, unless of course, you have a lit torch with you.
So, picking up items and using them might trigger global conditions that will affect other parts of the game.
The Items
These represent all the things” you can find inside a room. Every item shares the same ID and name that the nodes in the graph section had.
They will also have a “destination” property, which indicates where that item should be stored, once picked up. This is relevant because you will be able to have only one item in your hands, whereas you’ll be able to have as many as you’d like in your inventory.
Finally, some of these items might trigger other actions or status updates, depending on what the player decides to do with them. One example of this are the lit torches from the entrance. If you grab one of them, you’ll trigger a status update in the game, which in turn will make the game show you a different description of the next room.
Items can also have “subitems”, which come into play once the original item gets destroyed (through the “break” action, for example). An item can be broken down into several ones, and that is defined in the “subitems” element.
Essentially, this element is just an array of new items, one that also contains the set of actions that can trigger their creation. This basically opens up the possibility to create different subitems based on the actions you perform on the original item.
Finally, some items will have a “damage” property. So, if you use an item to hit an NPC, that value will be used to subtract life from them.
The Exits
This is simply a set of properties indicating the direction of the exit and the properties of it (a description, in case you want to inspect it, its name and, in some cases, its status).
Exits are a separate entity from items because the engine will need to understand if you can actually traverse them based on their status. Exits that are locked will not let you go through them unless you work out how to change their status to unlocked.
The NPCs
Finally, NPCs will be part of another list. They are basically items with statistics that the engine will use to understand how each one should behave. The ones we’ve defined in our example are “hp”, which stands for health points, and “damage”, which, just like the weapons, is the number that each hit will subtract from the player’s health.
That is it for the dungeon I created. It is a lot, yes, and in the future I might consider creating a level editor of sorts, to simplify the creation of the JSON files. But for now, that won’t be necessary.
In case you haven’t realized it yet, the main benefit of having our game defined in a file like this is that we’ll be able to switch JSON files like you did cartridges back in the Super Nintendo era. Just load up a new file and start a new adventure. Easy!
Closing Thoughts
Thanks for reading thus far. I hope you’ve enjoyed the design process I go through to bring an idea to life. Remember, though, that I’m making this up as I go, so we might realize later that something we defined today isn’t going to work, in which case we’ll have to backtrack and fix it.
I’m sure there are a ton of ways to improve the ideas presented here and to make one hell of an engine. But that would require a lot more words than I can put into an article without making it boring for everyone, so we’ll leave it at that for now.
 (rb, ra, al, il)
Articles on Smashing Magazine — For Web Designers And Developers
