Using CSCS Scripting Language For Cross-Platform Development
Using CSCS Scripting Language For Cross-Platform Development
Vassili Kaplan
Our goal is not to build a platform; it’s to be cross all of them.
— Mark Zuckerberg
CSCS (Customized Scripting in C#) is an open-source scripting language implemented in C#. Syntactically it’s very similar to JavaScript, but it also has some similarities with Python. Some of these similarities are the keywords in the well-known if…elif…else construct, and also have the same variable scope definition as in Python (e.g. a variable defined inside of an if block or inside a loop will be also visible outside).
As opposed to JavaScript and Python, variables and functions in CSCS are case-insensitive. The primary goal of CSCS is to let the developer write as little code as possible. Also, the same code is used for both iOS and Android development. Additionally, CSCS can be used for Windows, Mac, and Unity development.
Note: You can read more about how Microsoft uses CSCS in their Maquette product (based on Unity) over here.
CSCS can be added to your project by embedding its C# source code into a Visual Studio Xamarin project. Unlike most other languages, you have full ownership of the CSCS source code and can easily add or modify its functionality. I’ll be sharing an example of this later on in the article.
Also, we are going to learn how to get started with CSCS and use some more advanced features that have been covered in other articles. Among these features, we are going to access a Web Service via Web Requests with JSON string parsing, and we’ll also be using SQLite on iOS and Android.
The easiest way to get started is to download a sample of a project using CSCS and start playing with the start.cscs file. This is what we’ll be doing in the next section: creating an iOS/Android app with basic GUI and events.
“Hello, World!” In CSCS
Let’s start with a relatively simple example of CSCS code that constructs a screen with a few widgets:
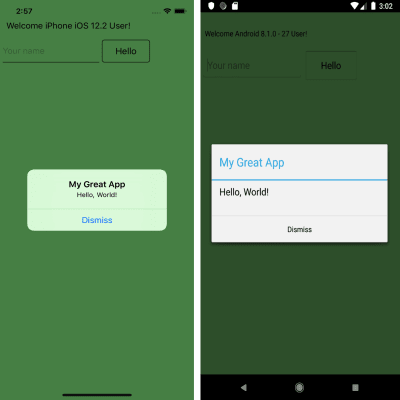
AutoScale(); SetBackgroundColor("light_green"); locLabelText = GetLocation("ROOT", "CENTER", "ROOT", "TOP"); AddLabel(locLabelText, "labelText", "Welcome " + _DEVICE_INFO_ + " " + _VERSION_INFO_ + " User!", 600, 100); locTextEdit = GetLocation("ROOT", "LEFT", labelText, "BOTTOM"); AddTextEdit(locTextEdit, "textEdit", "Your name", 320, 80); locButton = GetLocation(textEdit,"RIGHT",textEdit, "CENTER"); AddButton(locButton, "buttonHi", "Hello", 160, 80); function buttonHi_click(sender, arg) { name = getText(textEdit); msg = name != "" ? "Hello, "+ name + "!" : "Hello, World!"; AlertDialog("My Great App", msg); }The image below shows the resulting user interface on an iPhone as well as an Android device after clicking on the “Hello” button and not typing anything in the “Text Edit” field:

Let’s briefly go over the code above. It starts with the AutoScale() function call, and what that does is to tell the parser that the widget sizes are relative to the screen size, i.e. they will be auto-resized (the widget will look bigger on bigger screens and smaller on smaller screens). This setting could be also overridden per widget.
Note that there is no need to create a special handler on a button click. If you define a function with name widgetName_click(), it will be used as a handler when the user clicks on a widget called widgetName (it doesn’t have to be a button, it can actually be any widget). That’s why the function buttonHi_click() will be triggered as soon as the user clicks on the button.
You may have noticed that the GUI is constructed completely in code. This is done by supplying a relative widget location when adding it. The general format of a location command is the following:
location = GetLocation(WidgetX, HorizontalPlacement, WidgetY, VerticalPlacement, deltaX=0, deltaY=0, autoResize=true); So, you can place a widget relative to other widgets on the screen. A special case of a widget is a “ROOT” widget, meaning the main screen.
After creating a location, you need to provide it as an argument to any of the following functions:
AddLabel,AddButton,AddCombobox,AddStepper,AddListView,AddTextView,AddStepper,AddImageView,AddSlider,AddPickerView,- and so on.
All of the above have the same structure:
AddButton(location, newWidgetname, initialValue, width, height); The widget width and height will be relative to the screen size if the AutoScale() CSCS command was previously run. Also, the initial value (in case of a button) is the text shown on it. This can be changed anytime by invoking SetText(widgetName, newText).
Using Visual Studio Code To Debug CSCS
We can also use Visual Studio Code to debug CSCS scripts. If you want to develop apps for both Android and iOS, you need to use a Mac. After installing Visual Studio Code, install the CSCS Debugger and REPL extension.
In order to use the extension, add this line of code anywhere in your start.cscs CSCS script:
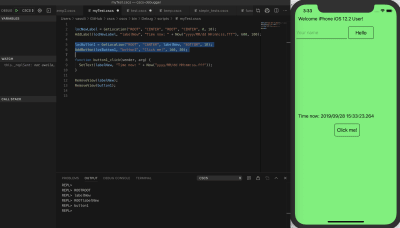
StartDebugger(); The following image below shows how you can use Visual Studio Code to debug and change the functionality of the “Hello, World!” app that we developed in the previous section. In the upcoming example, we’ll be adding a label and a button on the fly to the existing layout.
To do this, we just select the code to be executed by the parser and press Ctrl + 8. As a result, a label and a button will be added at the center of the screen. We also add a button handler that will update the new label with the current time on each button click.

Using SQLite In CSCS
SQLite is an ACID (Atomicity, Consistency, Isolation, Durability) type of a relational database, and was developed by Richard Hipp (the first version was released in 2000). In difference to other relational databases, like Microsoft SQL Server or Oracle Database, it’s embedded. (Embedded not only into the device, but also into the end program.) It’s included in the program as a very compact library, which is less than 500 KB in size. But two apps (released by the same developer) can read the same SQLite DB if the DB file path is known to both apps.
The advantage of SQLite is that it can be used without an extra installation on an iOS or an Android device. The disadvantage is that it obviously cannot hold as much data as a “normal” DB and also that it’s weakly typed (i.e. you can insert a string instead of an integer — it will then be converted to an integer or 0 on failure). On the other hand, the latter can be also seen as an advantage as well.
SQLite can be easily used from CSCS without extra import statements. Here’s a table that will help you get an overview of the main SQLite functions used in CSCS:
| Command | Description |
|---|---|
SQLInit(DBName) |
Initializes a database or sets a database to be used with consequent DB statements. |
SQLDBExists(DBName) |
Checks whether the DB has been initialized. Also sets the database to be used with consequent DB statements. |
SQLQuery(query) |
Executes an SQL query (a select statement). Returns a table with records. |
SQLNonQuery(nonQuery) |
Executes an SQL non-query, e.g. an update, create or delete statement. Returns number of records affected. |
SQLInsert(tableName, columnList, data) |
Inserts passed table of data of records to the specified DB table. The columnList argument has the following structure: colName1,colName2,…,colNameN |
Table 1: SQLite commands in CSCS
This is how the SQLInit() and SQLDBExists() functions are typically used:
DBName = "myDB.db1"; if (!SQLDBExists(DBName)) { create = "CREATE TABLE [Data] (Symbol ntext, Low real, High real, Close real, Volume real, Stamp text DEFAULT CURRENT_TIMESTAMP)"; SQLNonQuery(create); } SQLInit(DBName); We are going to see more examples of how you can select and insert data into an SQLite database later on. I’ll show you an example of how to write stock data that has been extracted from a Web Service into a local SQLite database.
Adding Custom Functionality To CSCS
In this section, we are going to see how you can extend the CSCS functionality. As an example, we are going to see the existing implementation of the CSCS Sleep function below.
To add custom functionality, all you need to do is create a new class by deriving from the ParserFunction class, overriding its Evaluate() method, and registering this class with the parser. Here’s a short version (without error checking):
class SleepFunction : ParserFunction { protected override Variable Evaluate(ParsingScript script) { List args = script.GetFunctionArgs(); int sleepms = Utils.GetSafeInt(args, 0); Thread.Sleep(sleepms); return Variable.EmptyInstance; } } Registration of a class with the parser can be done anywhere in the initialization stage via the following command:
ParserFunction.RegisterFunction("Sleep", new SleepFunction());That’s it! Now the Evaluate() method of the SleepFunction class will be invoked as soon as a “Sleep” token is extracted by the parser.
Note that CSCS is case insensitive (except the core control flow statements: if, elif, else, for, while, function, include, new, class, return, try, throw, catch, break, continue). This means that you can type either “sleep(100)” or “Sleep(100)” — both calls will suspend the executing thread for 100 milliseconds.
Processing JSON In CSCS
JSON (JavaScript Object Notation) is a lightweight data interchange format, consisting of attribute-value pairs and array-type pairs. It was developed by Douglas Crockford in the early 2000s (around same time when SQLite appeared as well).
In this section, we are going to learn how to parse JSON using CSCS.
The CSCS function to parse a JSON string is GetVariableFromJSON(jsonText). This function returns a hash table in which the keys are the attributes from the JSON string.
Consider the following example of a JSON string:
jsonString = '{ "eins" : 1, "zwei" : "zweiString", "mehr" : { "uno": "dos" }, "arrayValue" : [ "une", "deux" ] }';After invoking:
a = GetVariableFromJSON();The variable a will be a hash table with the following values:
a["eins"] = 1 a["zwei"] = "zweiString" a["mehr"]["uno"] = "dos" a["arrayValue"][0] = "une" a["arrayValue"][1] = "deux"In the next section, we are going to see another example of parsing a JSON string from a Web Service.
An Example Of An App With SQLite, Web Requests And JSON
For an app using SQLite, a Web Service and JSON parsing, we are going to use Alpha Vantage Web Service. You can get an API Key for free but the free version allows accessing their web service no more than 5 times per minute.
Using Alpha Vantage, you can extract various financial data sets — including stock prices. This is what we are going to do in our sample app.
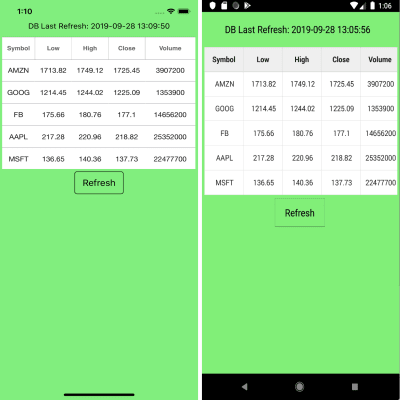
The image below shows how the Stocks apps looks on an iOS and on an Android device.

The CSCS code to build the GUI is the following:
locLabel = GetLocation("ROOT","CENTER", "ROOT","TOP", 0,30); AddLabel(locLabel, "labelRefresh", "", 480, 60); locSFWidget = GetLocation("ROOT","CENTER", labelRefresh,"BOTTOM"); AddSfDataGrid(locSFWidget, "DataGrid", "", graphWidth, graphHeight); listCols = {"Symbol","string", "Low","number", "High", "number", "Close","number", "Volume","number"}; AddWidgetData(DataGrid, listCols, "columns"); colWidth = {17, 19, 19, 19, 26}; AddWidgetData(DataGrid, colWidth, "columnWidth"); locButton = GetLocation("ROOT","CENTER",DataGrid,"BOTTOM"); AddButton(locButton, "buttonRefresh", "Refresh", 160, 80); locLabelError = GetLocation("ROOT","CENTER","ROOT","BOTTOM"); AddLabel(locLabelError, "labelError", "", 600, 160); SetFontColor(labelError, "red"); AlignText(labelError, "center"); getDataFromDB(); The getDataFromDB() method will extract all the data from the SQLite database. It uses the SQL query defined as follows:
query = "SELECT Symbol, Low, High, Close, Volume, DATETIME(Stamp, 'localtime') as Stamp FROM Data ORDER BY Stamp DESC LIMIT 5;";Take a look at the code below for the getDataFromDB() implementation.
function getDataFromDB() { results = SQLQuery(query); for (i = 1; i < results.Size; i++) { vals = results[i]; stock = vals[0]; low = Round(vals[1], 2); high = Round(vals[2], 2); close = Round(vals[3], 2); volume = Round(vals[4], 2); refresh = vals[5]; stockData = {stock, low, high, close, volume}; AddWidgetData(DataGrid, stockData, "item"); } SetText(labelRefresh, "DB Last Refresh: " + refresh); lockGui(false); }Now let’s see how we get data from the Alpha Vantage Web Service. First, we initialize the data:
baseURL = "https://www.alphavantage.co/query? " + "function=TIME_SERIES_DAILY&symbol="; apikey = "Y12T0TY5EUS6BC5F"; stocks = {"MSFT", "AAPL", "GOOG", "FB", "AMZN"}; totalStocks = stocks.Size;Next, we load stocks one by one as soon as the user clicks on the “Refresh” button:
function buttonRefresh_click(object, arg) { lockGui(); SetText(labelRefresh, "Loading ..."); SetText(labelError, ""); ClearWidget(DataGrid); loadedStocks = 0; getData(stocks[loadedStocks]); } function getData(symbol) { stockUrl = baseURL + symbol + "&apikey=" + apikey; WebRequest("GET", stockUrl, "", symbol, "OnSuccess", "OnFailure"); }Here’s the main CSCS function to use in order to get data from a Web Service:
WebRequest("GET", stockUrl, "", symbol, "OnSuccess", "OnFailure");The last two parameters are functions to invoke on completion of the web request. For example, in case of a failure, the following CSCS function will be called:
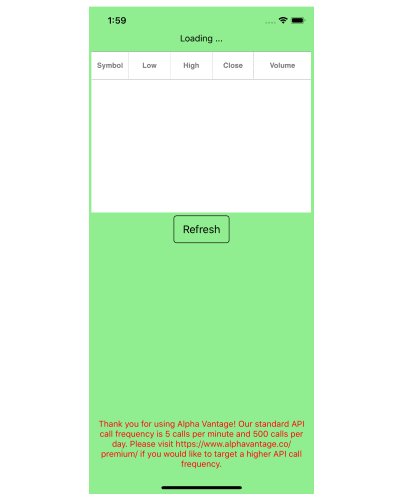
function OnFailure(object, errorCode, text) { SetText(labelError, text); lockGui(false); }As a result, the user will get an error message as shown below:

But, if all is good, we are going to parse the JSON string and insert its contents into the SQLite DB.
function OnSuccess(object, errorCode, text) { jsonFromText = GetVariableFromJSON(text); metaData = jsonFromText[0]; result = jsonFromText[1]; symbol = metaData["2. Symbol"]; lastRefreshed = metaData["3. Last Refreshed"]; allDates = result.keys; dateData = result[allDates[0]]; high = Round(dateData["2. high"], 2); low = Round(dateData["3. low"], 2); close = Round(dateData["4. close"], 2); volume = dateData["5. volume"]; stockData = {symbol, low, high, close, volume}; SQLInsert("Data","Symbol,Low,High,Close,Volume",stockData); if (++loadedStocks >= totalStocks) { getDataFromDB(); } else { getData(stocks[loadedStocks]); } }In order to understand how we access different fields in the hash table above, let’s take a look at the actual string received from the Alpha Vantage web request:
{ "Meta Data": { "1. Information": "Daily Prices (open, high, low, close) and Volumes", "2. Symbol": "MSFT", "3. Last Refreshed": "2019-10-02 14:23:20", "4. Output Size": "Compact", "5. Time Zone": "US/Eastern" }, "Time Series (Daily)": { "2019-10-02": { "1. open": "136.3400", "2. high": "136.3700", "3. low": "133.5799", "4. close": "134.4100", "5. volume": "11213086" }, … } }As you can see, we get the latest date as the first element of the allDates array that consists all of the extracted dates.
Conclusion
Adding CSCS to your project is easy. All you need to do is simply embed the source code of CSCS as a module to your project — just like it’s done in a sample Xamarin project.
Do you use and extend CSCS scripting language in your projects? Leave a comment below — I’d be happy to hear from you!
Further Reading
If you want to explore the CSCS language a bit more, here are some of the articles I’ve written about on the topic:
- “A Split-and-Merge Expression Parser in C#,” MSDN Magazine (Oct. 2015)
- “Customizable Scripting in C#,” MSDN Magazine (Feb. 2016)
- “Writing Native Mobile Apps Using a Customizable Scripting Language,” MSDN Magazine (Feb. 2018)
- “CSCS: Customized Scripting in C#,” GitHub
- “Developing Cross-Platform Native Apps with a Functional Scripting Language,” CODE Magazine
- “Implementing A Custom Language Succinctly” (eBook)
- “Writing Native Mobile Apps in a Functional Language Succinctly” (eBook)
As an additional resource, I also recommend reading how you can improve CSCS performance by precompiling its functions.
 (ra, yk, il)
Articles on Smashing Magazine — For Web Designers And Developers
