
Automating Your Feature Testing With Selenium WebDriver
Automating Your Feature Testing With Selenium WebDriver
Nils Schütte
This article is for web developers who wish to spend less time testing the front end of their web applications but still want to be confident that every feature works fine. It will save you time by automating repetitive online tasks with Selenium WebDriver. You will find a step-by-step example for automating and testing the login function of WordPress, but you can also adapt the example for any other login form.
What Is Selenium And How Can It Help You?
Selenium is a framework for the automated testing of web applications. Using Selenium, you can basically automate every task in your browser as if a real person were to execute the task. The interface used to send commands to the different browsers is called Selenium WebDriver. Implementations of this interface are available for every major browser, including Mozilla Firefox, Google Chrome and Internet Explorer.
Automating Your Feature Testing With Selenium WebDriver
Which type of web developer are you? Are you the disciplined type who tests all key features of your web application after each deployment. If so, you are probably annoyed by how much time this repetitive testing consumes. Or are you the type who just doesn’t bother with testing key features and always thinks, “I should test more, but I’d rather develop new stuff.” If so, you probably only find bugs by chance or when your client or boss complains about them.
I have been working for a well-known online retailer in Germany for quite a while, and I always belonged to the second category: It was so exciting to think of new features for the online shop, and I didn’t like at all going over all of the previous features again after each new software deployment. So, the strategy was more or less to hope that all key features would work.
One day, we had a serious drop in our conversion rate and started digging in our web analytics tools to find the source of this drop. It took quite a while before we found out that our checkout did not work properly since the previous software deployment.
This was the day when I started to do some research about automating our testing process of web applications, and I stumbled upon Selenium and its WebDriver. Selenium is basically a framework that allows you to automate web browsers. WebDriver is the name of the key interface that allows you to send commands to all major browsers (mobile and desktop) and work with them as a real user would.
Preparing The First Test With Selenium WebDriver
First, I was a little skeptical of whether Selenium would suit my needs because the framework is most commonly used in Java, and I am certainly not a Java expert. Later, I learned that being a Java expert is not necessary to take advantage of the power of the Selenium framework.
As a simple first test, I tested the login of one of my WordPress projects. Why WordPress? Just because using the WordPress login form is an example that everybody can follow more easily than if I were to refer to some custom web application.
What do you need to start using Selenium WebDriver? Because I decided to use the most common implementation of Selenium in Java, I needed to set up my little Java environment.
If you want to follow my example, you can use the Java environment of your choice. If you haven’t set one up yet, I suggest installing Eclipse and making sure you are able to run a simple “Hello world” script in Java.
Because I wanted to test the login in Chrome, I made sure that the Chrome browser was already installed on my machine. That’s all I did in preparation.
Downloading The ChromeDriver
All major browsers provide their own implementation of the WebDriver interface. Because I wanted to test the WordPress login in Chrome, I needed to get the WebDriver implementation of Chrome: ChromeDriver.
I extracted the ZIP archive and stored the executable file chromedriver.exe in a location that I could remember for later.
Setting Up Our Selenium Project In Eclipse
The steps I took in Eclipse are probably pretty basic to someone who works a lot with Java and Eclipse. But for those like me, who are not so familiar with this, I will go over the individual steps:
- Open Eclipse.
- Click the “New” icon.

Creating a new project in Eclipse - Choose the wizard to create a new “Java Project,” and click “Next.”
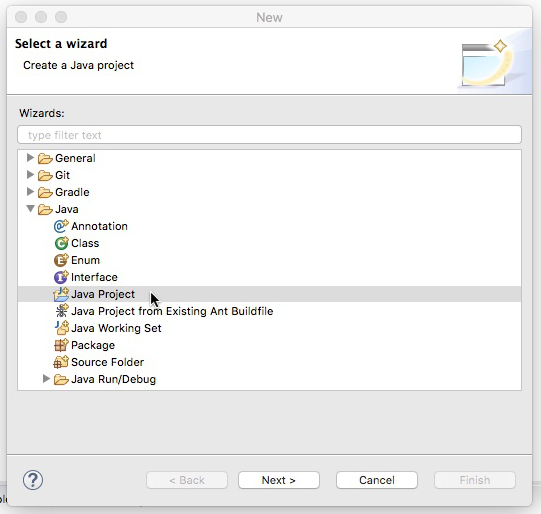
Choose the java-project wizard. - Give your project a name, and click “Finish.”
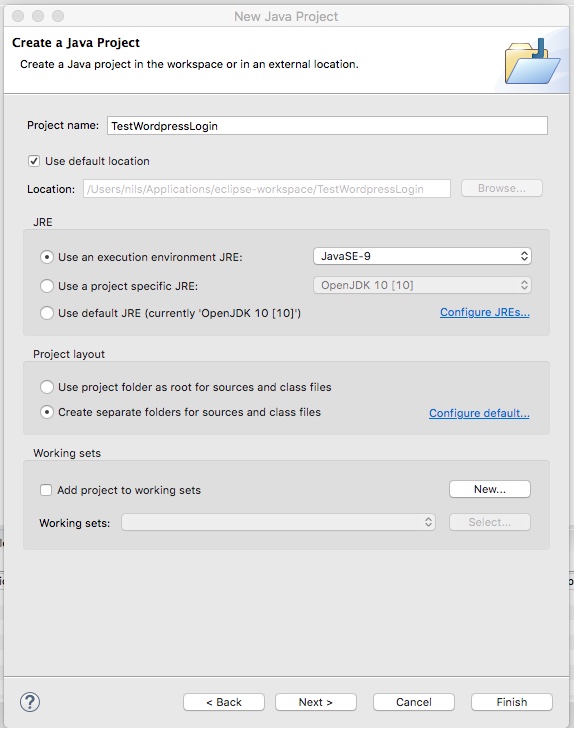
The eclipse project wizard - Now you should see your new Java project on the left side of the screen.

We successfully created a project to run the Selenium WebDriver.
Adding The Selenium Library To Our Project
Now we have our Java project, but Selenium is still missing. So, next, we need to bring the Selenium framework into our Java project. Here are the steps I took:
- Download the latest version of the Java Selenium library.

Download the Selenium library. - Extract the archive, and store the folder in a place you can remember easily.
- Go back to Eclipse, and go to “Project” → “Properties.”
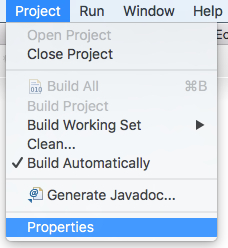
Go to properties to integrate the Selenium WebDriver in you project. - In the dialog, go to “Java Build Path” and then to register “Libraries.”
- Click on “Add External JARs.”
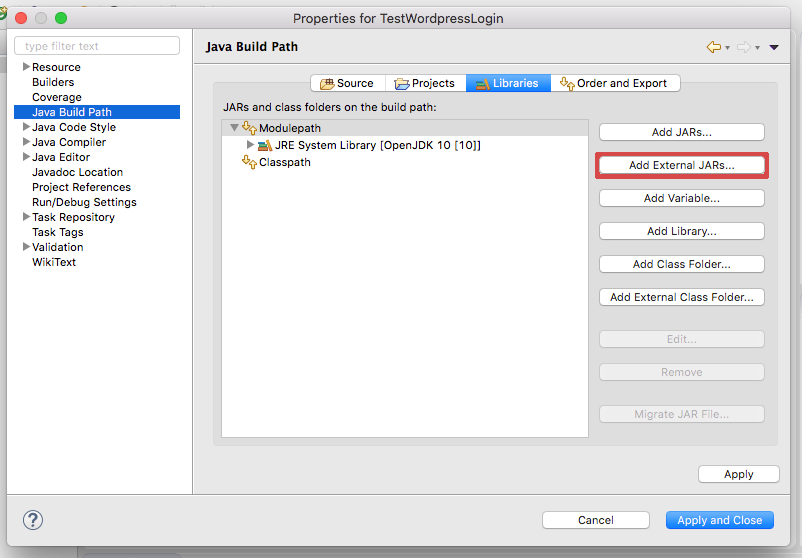
Add the Selenium lib to your Java build path. - Navigate to the just downloaded folder with the Selenium library. Highlight all
.jarfiles and click “Open.”

Select all files of the lib to add to your project. - Repeat this for all
.jarfiles in the subfolderlibsas well. - Eventually, you should see all
.jarfiles in the libraries of your project:
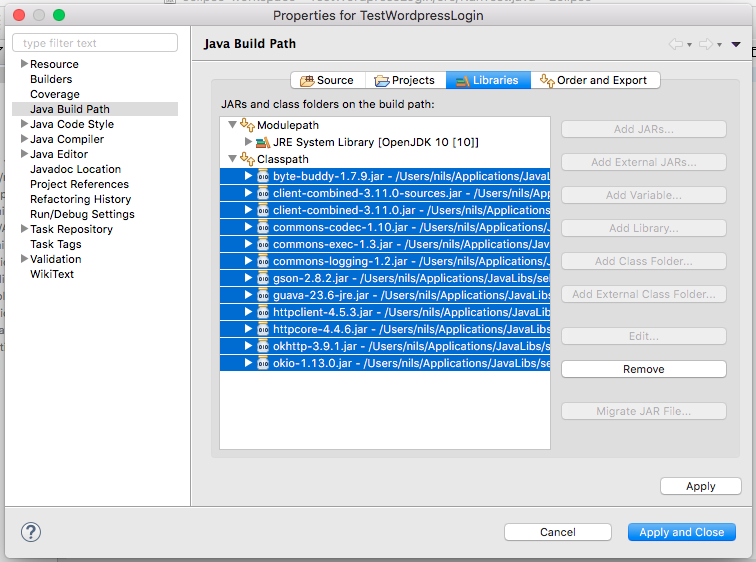
The Selenium WebDriver framework has now been successfully integrated into your project!
That’s it! Everything we’ve done until now is a one-time task. You could use this project now for all of your different tests, and you wouldn’t need to do the whole setup process for every test case again. Kind of neat, isn’t it?
Creating Our Testing Class And Letting It Open the Chrome Browser
Now we have our Selenium project, but what next? To see whether it works at all, I wanted to try something really simple, like just opening my Chrome browser.
To do this, I needed to create a new Java class from which I could execute my first test case. Into this executable class, I copied a few Java code lines, and believe it or not, it worked! Magically, the Chrome browser opened and, after a few seconds, closed all by itself.
Try it yourself:
- Click on the “New” button again (while you are in your new project’s folder).

Create a new class to run the Selenium WebDriver. - Choose the “Class” wizard, and click “Next.”

Choose the Java class wizard to create a new class. - Name your class (for example, “RunTest”), and click “Finish.”
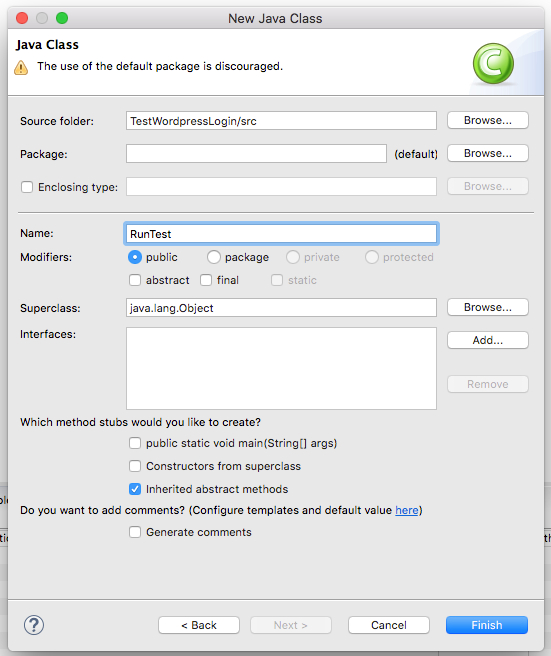
The eclipse Java Class wizard. - Replace all code in your new class with the following code. The only thing you need to change is the path to
chromedriver.exeon your computer:
import org.openqa.selenium.WebDriver; import org.openqa.selenium.chrome.ChromeDriver; /** * @author Nils Schuette via frontendtest.org */ public class RunTest { static WebDriver webDriver; /** * @param args * @throws InterruptedException */ public static void main(final String[] args) throws InterruptedException { // Telling the system where to find the chrome driver System.setProperty( "webdriver.chrome.driver", "C:/PATH/TO/chromedriver.exe"); // Open the Chrome browser webDriver = new ChromeDriver(); // Waiting a bit before closing Thread.sleep(7000); // Closing the browser and WebDriver webDriver.close(); webDriver.quit(); } } - Save your file, and click on the play button to run your code.
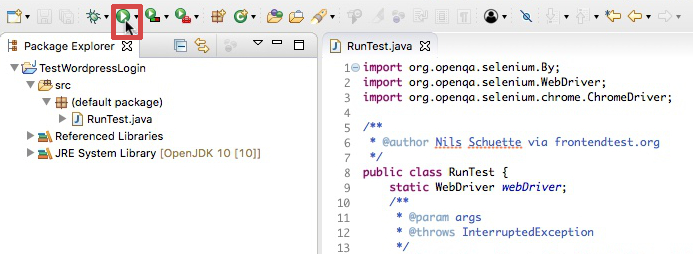
Running your first Selenium WebDriver project. - If you have done everything correctly, the code should open a new instance of the Chrome browser and close it shortly thereafter.

The Chrome Browser opens itself magically. (Large preview)
Testing The WordPress Admin Login
Now I was optimistic that I could automate my first little feature test. I wanted the browser to navigate to one of my WordPress projects, login to the admin area and verify that the login was successful. So, what commands did I need to look up?
- Navigate to the login form,
- Locate the input fields,
- Type the username and password into the input fields,
- Hit the login button,
- Compare the current page’s headline to see if the login was successful.
Again, after I had done all the necessary updates to my code and clicked on the run button in Eclipse, my browser started to magically work itself through the WordPress login. I successfully ran my first automated website test!
If you want to try this yourself, replace all of the code of your Java class with the following. I will go through the code in detail afterwards. Before executing the code, you must replace four values with your own:
-
The location of your
chromedriver.exefile (as above), -
The URL of the WordPress admin account that you want to test,
-
The WordPress username,
-
The WordPress password.
Then, save and let it run again. It will open Chrome, navigate to the login of your WordPress website, login and check whether the h1 headline of the current page is “Dashboard.”
import org.openqa.selenium.By; import org.openqa.selenium.WebDriver; import org.openqa.selenium.chrome.ChromeDriver; /** * @author Nils Schuette via frontendtest.org */ public class RunTest { static WebDriver webDriver; /** * @param args * @throws InterruptedException */ public static void main(final String[] args) throws InterruptedException { // Telling the system where to find the chrome driver System.setProperty( "webdriver.chrome.driver", "C:/PATH/TO/chromedriver.exe"); // Open the Chrome browser webDriver = new ChromeDriver(); // Maximize the browser window webDriver.manage().window().maximize(); if (testWordpresslogin()) { System.out.println("Test WordPress Login: Passed"); } else { System.out.println("Test WordPress Login: Failed"); } // Close the browser and WebDriver webDriver.close(); webDriver.quit(); } private static boolean testWordpresslogin() { try { // Open google.com webDriver.navigate().to("https://www.YOUR-SITE.org/wp-admin/"); // Type in the username webDriver.findElement(By.id("user_login")).sendKeys("YOUR_USERNAME"); // Type in the password webDriver.findElement(By.id("user_pass")).sendKeys("YOUR_PASSWORD"); // Click the Submit button webDriver.findElement(By.id("wp-submit")).click(); // Wait a little bit (7000 milliseconds) Thread.sleep(7000); // Check whether the h1 equals “Dashboard” if (webDriver.findElement(By.tagName("h1")).getText() .equals("Dashboard")) { return true; } else { return false; } // If anything goes wrong, return false. } catch (final Exception e) { System.out.println(e.getClass().toString()); return false; } } } If you have done everything correctly, your output in the Eclipse console should look something like this:

Understanding The Code
Because you are probably a web developer and have at least a basic understanding of other programming languages, I am sure you already grasp the basic idea of the code: We have created a separate method, testWordpressLogin, for the specific test case that is called from our main method.
Depending on whether the method returns true or false, you will get an output in your console telling you whether this specific test passed or failed.
This is not necessary, but this way you can easily add many more test cases to this class and still have readable code.
Now, step by step, here is what happens in our little program:
- First, we tell our program where it can find the specific WebDriver for Chrome.
System.setProperty("webdriver.chrome.driver","C:/PATH/TO/chromedriver.exe"); - We open the Chrome browser and maximize the browser window.
webDriver = new ChromeDriver(); webDriver.manage().window().maximize(); - This is where we jump into our submethod and check whether it returns true or false.
if (testWordpresslogin()) … - The following part in our submethod might not be intuitive to understand:
Thetry{…}catch{…}blocks. If everything goes as expected, only the code intry{…}will be executed, but if anything goes wrong while executingtry{…}, then the execution continuous incatch{}. Whenever you try to locate an element withfindElementand the browser is not able to locate this element, it will throw an exception and execute the code incatch{…}. In my example, the test will be marked as “failed” whenever something goes wrong and thecatch{}is executed. - In the submethod, we start by navigating to our WordPress admin area and locating the fields for the username and the password by looking for their IDs. Also, we type the given values in these fields.
webDriver.navigate().to("https://www.YOUR-SITE.org/wp-admin/"); webDriver.findElement(By.id("user_login")).sendKeys("YOUR_USERNAME"); webDriver.findElement(By.id("user_pass")).sendKeys("YOUR_PASSWORD");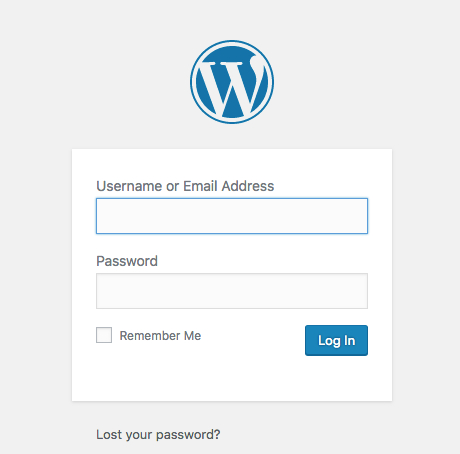
Selenium fills out our login form - After filling in the login form, we locate the submit button by its ID and click it.
webDriver.findElement(By.id("wp-submit")).click(); - In order to follow the test visually, I include a 7-second pause here (7000 milliseconds = 7 seconds).
Thread.sleep(7000); - If the login is successful, the
h1headline of the current page should now be “Dashboard,” referring to the WordPress admin area. Because theh1headline should exist only once on every page, I have used the tag name here to locate the element. In most other cases, the tag name is not a good locator because an HTML tag name is rarely unique on a web page. After locating theh1, we extract the text of the element withgetText()and check whether it is equal to the string “Dashboard.” If the login is not successful, we would not find “Dashboard” as the currenth1. Therefore, I’ve decided to use theh1to check whether the login is successful.
if (webDriver.findElement(By.tagName("h1")).getText().equals("Dashboard")) { return true; } else { return false; }
Letting the WebDriver check, whether we have arrived on the Dashboard: Test passed! (Large preview) - If anything has gone wrong in the previous part of the submethod, the program would have jumped directly to the following part. The
catchblock will print the type of exception that happened to the console and afterwards returnfalseto the main method.
catch (final Exception e) { System.out.println(e.getClass().toString()); return false; }
Adapting The Test Case
This is where it gets interesting if you want to adapt and add test cases of your own. You can see that we always call methods of the webDriver object to do something with the Chrome browser.
First, we maximize the window:
webDriver.manage().window().maximize();Then, in a separate method, we navigate to our WordPress admin area:
webDriver.navigate().to("https://www.YOUR-SITE.org/wp-admin/");There are other methods of the webDriver object we can use. Besides the two above, you will probably use this one a lot:
webDriver.findElement(By. …)The findElement method helps us find different elements in the DOM. There are different options to find elements:
By.idBy.cssSelectorBy.classNameBy.linkTextBy.nameBy.xpath
If possible, I recommend using By.id because the ID of an element should always be unique (unlike, for example, the className), and it is usually not affected if the structure of your DOM changes (unlike, say, the xPath).
Note: You can read more about the different options for locating elements with WebDriver over here.
As soon as you get ahold of an element using the findElement method, you can call the different available methods of the element. The most common ones are sendKeys, click and getText.
We’re using sendKeys to fill in the login form:
webDriver.findElement(By.id("user_login")).sendKeys("YOUR_USERNAME");We have used click to submit the login form by clicking on the submit button:
webDriver.findElement(By.id("wp-submit")).click();And getText has been used to check what text is in the h1 after the submit button is clicked:
webDriver.findElement(By.tagName("h1")).getText()Note: Be sure to check out all the available methods that you can use with an element.
Conclusion
Ever since I discovered the power of Selenium WebDriver, my life as a web developer has changed. I simply love it. The deeper I dive into the framework, the more possibilities I discover — running one test simultaneously in Chrome, Internet Explorer and Firefox or even on my smartphone, or taking screenshots automatically of different pages and comparing them. Today, I use Selenium WebDriver not only for testing purposes, but also to automate repetitive tasks on the web. Whenever I see an opportunity to automate my work on the web, I simply copy my initial WebDriver project and adapt it to the next task.
If you think that Selenium WebDriver is for you, I recommend looking at Selenium’s documentation to find out about all of the possibilities of Selenium (such as running tasks simultaneously on several (mobile) devices with Selenium Grid).
I look forward to hearing whether you find WebDriver as useful as I do!
 (rb, ra, al, il)
Articles on Smashing Magazine — For Web Designers And Developers
