Spinning Up Multiple WordPress Sites Locally With DevKinsta
When building themes and plugins for WordPress, we need to make sure they work well in all the different environments where they will be installed. We can sometimes control this environment when creating a theme for our own websites, but at other times we cannot, such as when distributing our plugins via the public WordPress repository for anyone to download and install it.
Concerning WordPress, the possible combinations of environments for us to worry about include:
- Different versions of PHP,
- Different versions of WordPress,
- Different versions of the WordPress editor (aka the block editor),
- HTTPS enabled/disabled,
- Multisite enabled/disabled.
Let’s see how this is the case. PHP 8.0, which is the latest version of PHP, has introduced breaking changes from the previous versions. Since WordPress still officially supports PHP 5.6, our plugin may need to support 7 versions of PHP: PHP 5.6, plus PHP 7.0 to 7.4, plus PHP 8.0. If the plugin requires some specific feature of PHP, such as typed properties (introduced in PHP 7.4), then it will need to support that version of PHP onward (in this case, PHP 7.4 and PHP 8.0).
Concerning versioning in WordPress, this software itself may occasionally introduce breaking changes, such as the update to a newer version of jQuery in WordPress 5.6. In addition, every major release of WordPress introduces new features (such as the new Gutenberg editor, introduced in version 5.0), which could be required for our products.
The block editor it’s no exception. If our themes and plugins contain custom blocks, testing them for all different versions is imperative. At the very minimum, we need to worry about two versions of Gutenberg: the one shipped in WordPress core, and the one available as a standalone plugin.
Concerning both HTTPS and multisite, our themes and plugins could behave differently depending on these being enabled or not. For instance, we may want to disable access to a REST endpoint when not using HTTPS or provide extended capabilities to the super admin from the multisite.
This means there are many possible environments that we need to worry about. How do we handle it?
Figuring Out The Environments
Everything that can be automated, must be automated. For instance, to test the logic on our themes and plugins, we can create a continuous integration process that runs a set of tests on multiple environments. Automation takes a big chunk of the pain away.
However, we can’t just rely on having machines do all the work for us. We will also need to access some testing WordPress site to visualize if, after some software upgrade, our themes still look as intended. For instance, if Gutenberg updates its global styles system or how a core block behaves, we want to check that our products were not impacted by the change.
How many different environments do we need to support? Let’s say we are targeting 4 versions of PHP (7.2 to 8.0), 5 versions of WordPress (5.3 to 5.7), 2 versions of Gutenberg (core/plugin), HTTPS enabled/disabled, and multisite on/off. It all amounts to a total of 160 possible environments. That’s way too much to handle.
To simplify matters, instead of producing a site for each possible combination, we can reduce it to a handful of environments that, overall, comprise all the different properties.
For instance, we can produce these five environments:
- PHP 7.2 + WP 5.3 + Gutenberg core + HTTPS + multisite
- PHP 7.3 + WP 5.4 + Gutenberg plugin + HTTPS + multisite
- PHP 7.4 + WP 5.5 + Gutenberg plugin + no HTTPS + no multisite
- PHP 8.0 + WP 5.6 + Gutenberg core + HTTPS + no multisite
- PHP 8.0 + WP 5.7 + Gutenberg core + no HTTPS + no multisite
Spinning up 5 WordPress sites is manageable, but it is not easy since it involves technical challenges, particularly enabling different versions of PHP, and providing HTTPS certificates.
We want to spin up WordPress sites easily, even if we have limited knowledge of systems. And we want to do it quickly since we have our development and design work to do. How can we do it?
Managing Local WordPress Sites With DevKinsta
Fortunately, spinning up local WordPress sites is not difficult nowadays, since we can avoid the manual work, and instead rely on a tool that automates the process for us.
DevKinsta is exactly this kind of tool. It enables to launch a local WordPress site with minimum effort, for any desired configuration. The site will be created in less time it takes to drink a cup of coffee. And it certainly costs less than a cup of coffee: DevKinsta is 100% free and available for Windows, macOS, and Ubuntu users.

As its name suggests, DevKinsta was created by Kinsta, one of the leading hosting providers in the WordPress space. Their goal is to simplify the process of working with WordPress projects, whether for designers or developers, freelancers, or agencies. The easier we can set up our environment, the more we can focus on our own themes and plugins, the better our products will be.
The magic that powers DevKinsta is Docker, the software that enables to isolate an app from its environment via containers. However, we are not required to know about Docker or containers: DevKinsta hides the underlying complexity away, so we can just launch the WordPress site at the press of a button.

In this article, we will explore how to use DevKinsta to launch the 5 different local WordPress instances for testing a plugin, and what nice features we have at our disposal.
Launching A WordPress Site With DevKinsta
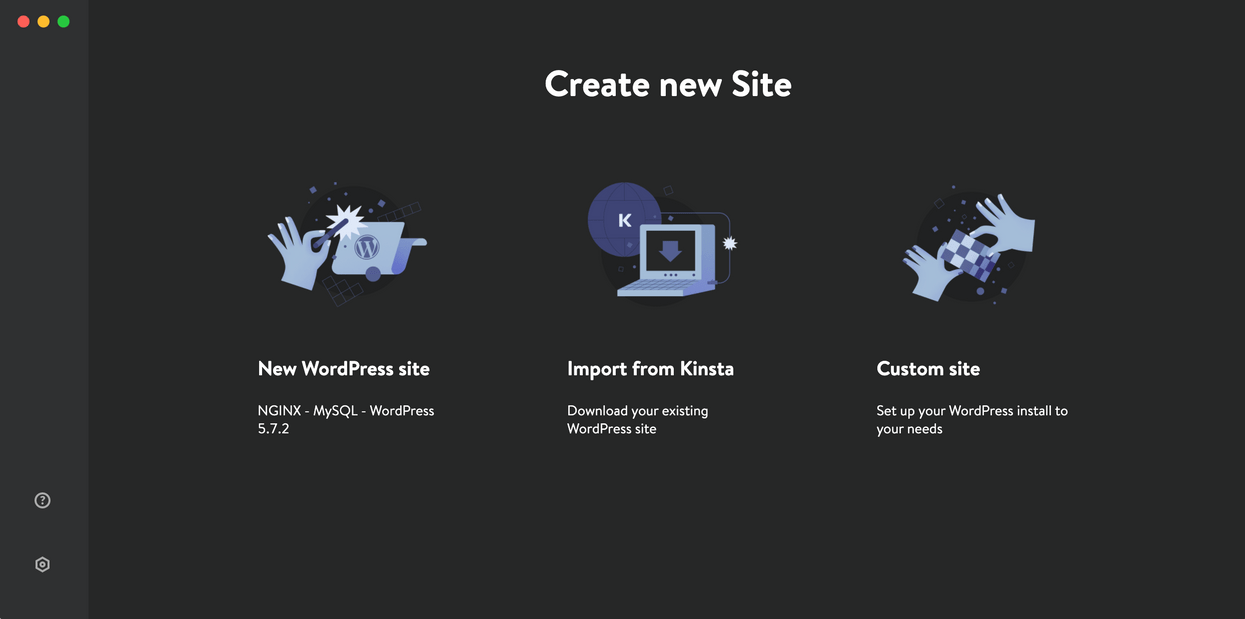
The images from above show DevKinsta when opening it for the first time. It presents 3 options for creating a new local WordPress site:
- New WordPress site
It uses the default configuration, including the latest WordPress release and PHP 8. - Import from Kinsta
It clones the configuration from an existing site hosted at MyKinsta. - Custom site
It uses a custom configuration, provided by you.
Pressing on option #1 will literally produce a local WordPress site without even thinking about it. I could explain a bit further if only I could; there’s really not more to it than that.
If you happen to be a Kinsta user, then pressing on option #2 allows you to directly import a site from MyKinsta, including a dump of its database. (Btw, it works in the opposite direction too: local changes in DevKinsta can be pushed to a staging site in MyKinsta.)
Finally, when pressing on option #3, we can specify what custom configuration to use for the local WordPress site.
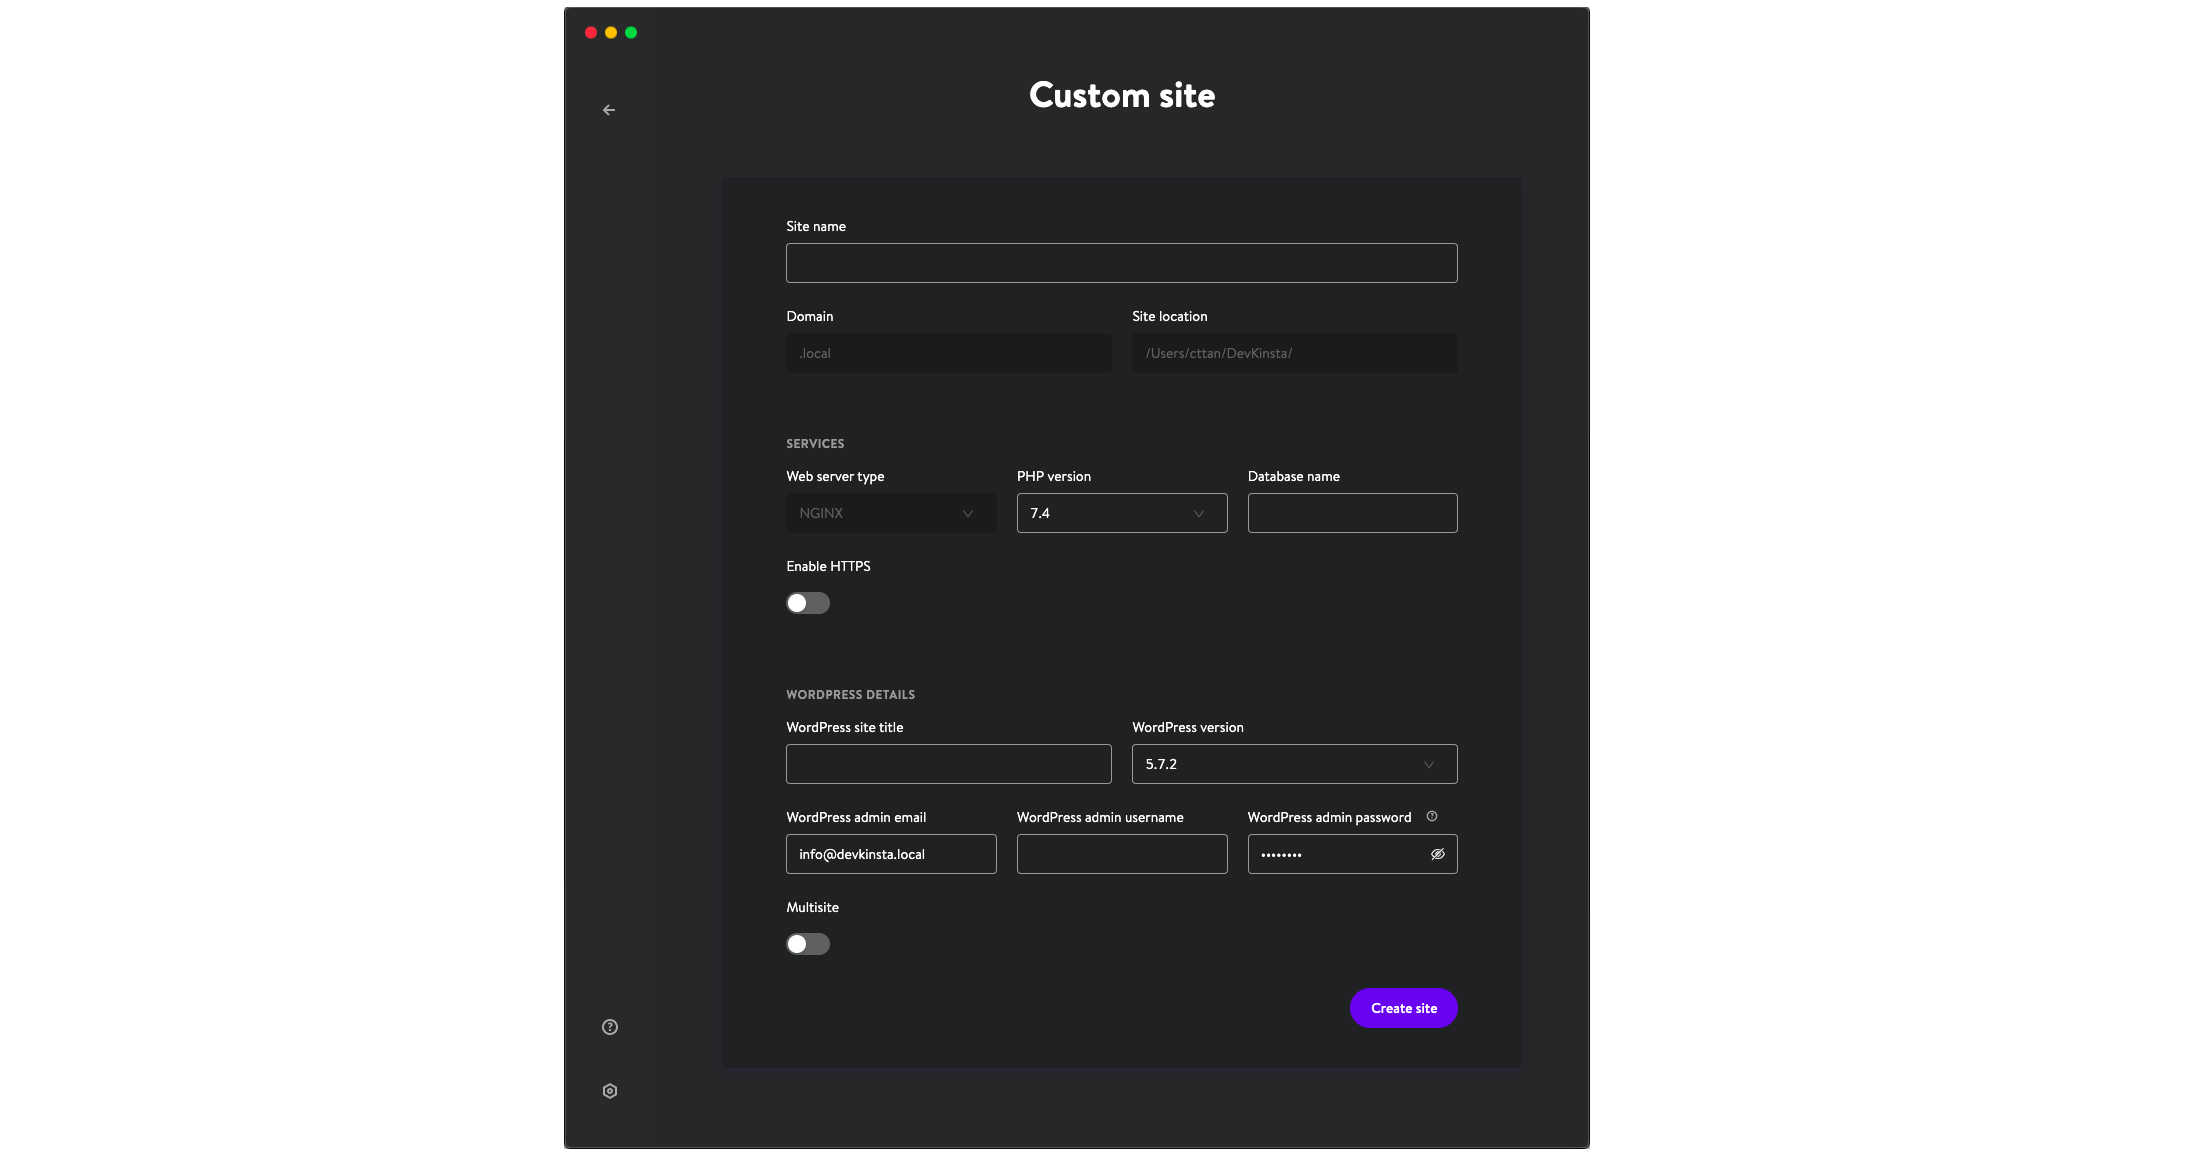
Let’s press the button for option #3. The configuration screen will look like this:

A few inputs are read-only. These are options that are currently fixed but will be made configurable sometime in the future. For instance, the webserver is currently set to Nginx, but work to add Apache is underway.
The options we can presently configure are the following:
- The site’s name (from which the local URL is calculated),
- PHP version,
- Database name,
- HTTPS enabled/disabled,
- The WordPress site’s title,
- WordPress version,
- The admin’s email, username and password,
- Multisite enabled/disabled.
After completing this information for my first local WordPress site, called “GraphQL API on PHP 80”, and clicking on “Create site”, all it took for DevKinsta to create the site was just 2 minutes. Then, I’m presented the info screen for the newly-created site:

The new WordPress site is available under its own local domain graphql-api-on-php80.local. Clicking on the “Open site” button, we can visualize our new site in the browser:

I repeated this process for all the different required environments, and voilà, my 5 local WordPress sites were up and running in no time. Now, DevKinsta’s initial screen list down all my sites:

Using WP-CLI
From the required configuration for my environments, I’ve so far satisfied all items except one: installing Gutenberg as a plugin.
Let’s do this next. We can install a plugin the usual via the WP admin, which we can access by clicking on the “WP admin” button from the site info screen, as seen in the image above.
Even better, DevKinsta ships with WP-CLI already installed, so we can interact with the WordPress site via the command-line interface.
In this case, we need to have a minimal knowledge of Docker. Executing a command within a container is done like this:
docker exec {containerName} /bin/bash -c '{command}'The needed parameters are:
- DevKinsta’s container is called
devkinsta_fpm. - The WP-CLI command to install and activate a plugin is
wp plugin install {pluginName} --activate --path={pathToSite} --allow-root - The path to the WordPress site, within the container, is
/www/kinsta/public/{siteName}.
Putting everything together, the command to install and activate the Gutenberg plugin in the local WordPress site is this one:
docker exec devkinsta_fpm /bin/bash -c 'wp plugin install gutenberg --activate --path=/www/kinsta/public/MyLocalSite --allow-root'Exploring Features
There are a couple of handy features available for our local WordPress sites.
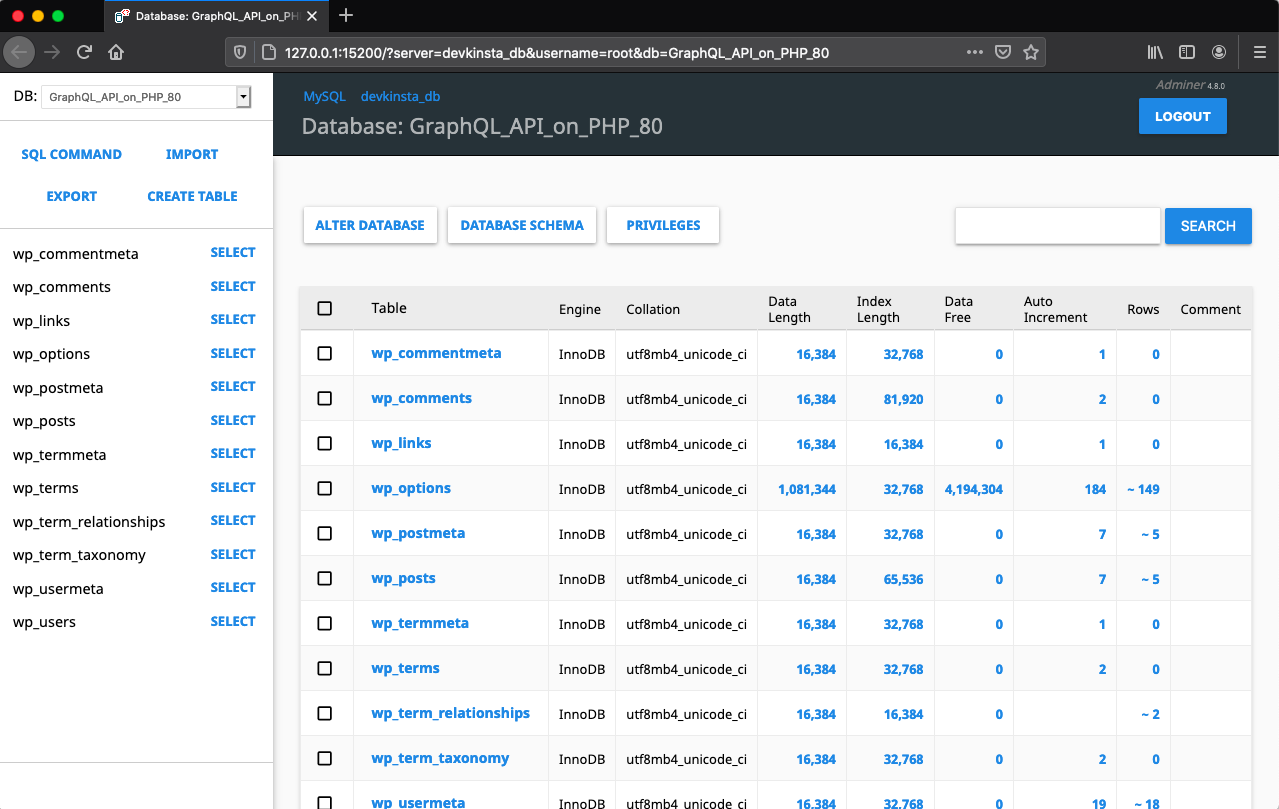
The first one is the integration with Adminer, a tool similar to phpMyAdmin, to manage the database. With this tool, we can directly fetch and edit the data through a custom SQL query. Clicking on the “Database manager” button, on the site info screen, will open Adminer in a new browser tab:

The second noteworthy feature is the integration with Mailhog, the popular email testing tool. Thanks to this tool, any email sent from the local WordPress site is not actually sent out, but is captured, and displayed on the Email inbox:

Clicking on an email, we can see its contents:

Accessing The Local Installation Files
After installing the local WordPress site, its folder containing all of its files (including WordPress core, installed themes and plugins, and uploaded media items) will be publicly available:
- Mac and Linux: under
/Users/{username}/DevKinsta/public/{siteName}. - Windows: under
C:\Users\{username}\DevKinsta\public\{siteName}.
(In other words: the local WordPress site’s files can be accessed not only through the Docker container, but also through the filesystem in our OS, such as using My PC on Windows, Finder in Mac, or any terminal.)
This is very convenient since it offers a shortcut for installing the themes and plugins we’re developing, speeding up our work.
For instance, to test a change in a plugin in all 5 local sites, we’d normally have to go to the WP admin on each site, and upload the new version of the plugin (or, alternatively, use WP-CLI).
By having access to the site’s folder, though, we can simply clone the plugin from its repo, directly under wp-content/plugins:
$ cd ~/DevKinsta/public/MyLocalSite/wp-content/plugins $ git clone git@github.com:leoloso/MyAwesomePlugin.gitThis way, we can just git pull to update our plugin to its latest version, making it immediately available in the local WordPress site:
$ cd MyAwesomePlugin $ git pullIf we want to test the plugin under development on a different branch, we can similarly do a git checkout:
git checkout some-branch-with-new-featureSince we may have several sites with different environments, we can automate this procedure by executing a bash script, which iterates the local WordPress sites and, for each, executes a git pull for the plugin installed within:
#!/bin/bash  iterateSitesAndGitPullPlugin(){   cd ~/DevKinsta/public/
  for file in *   do     if [ -d "$  file" ]; then       cd ~/DevKinsta/public/$  file/wp-content/plugins/MyAwesomePlugin       git pull     fi   done }  iterateSitesAndGitPullPlugin
Conclusion
When designing and developing our WordPress themes and plugins, we want to be able to focus on our actual work, as much as possible. If we can automate setting up the working environment, we can then invest the extra time and energy into our product.
This is what DevKinsta makes possible. We can spin up a local WordPress site by just pressing a button, and create many sites with different environments in just a few minutes.
DevKinsta is being actively developed and supported. If you run into any issue or have some inquiry, you can browse through the documentation or head to the Community forum, where the creators of DevKinsta will help you out.
All of this, for free. Sounds good? If so, download DevKinsta and go spin up your local WordPress sites.
Articles on Smashing Magazine — For Web Designers And Developers
