Django Highlights: Models, Admin, And Harnessing The Relational Database (Part 3)
Django Highlights: Models, Admin, And Harnessing The Relational Database (Part 3)
Philip Kiely
Before we get started, I want to note that Django’s built-in administrative capabilities, even after customization, are not meant for end-users. The admin panel exists as a developer, operator, and administrator tool for creating and maintaining software. It is not intended to be used to give end-users moderation capabilities or any other administrator abilities over the platform you develop.
This article is based on a hypothesis in two parts:
- The Django admin panel is so intuitive that you basically already know how to use it.
- The Django admin panel is so powerful that we can use it as a tool for learning about representing data in a relational database using a Django model.
I offer these ideas with the caveat that we will still need to write some configuration code to activate the admin panel’s more powerful abilities, and we will still need to use Django’s models-based ORM (object-relational mapping) to specify the representation of data in our system.
Recommended Reading
“Django Highlights” is a series introducing important concepts of web development in Django. You might want to read up on providing secure user authentication flows and follow alongside a demonstration on using Django templating to write complex pages.
Setting Up
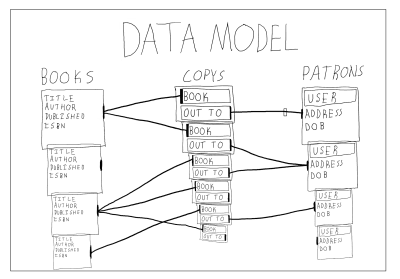
We’re going to be working with a sample project in this article. The project models some data that a library would store about its books and patrons. The example should be fairly applicable to many types of systems that manage users and/or inventory. Here’s a sneak peek of what the data looks like:

Please complete the following steps to get the example code running on your local machine.
1. Installing Packages
With Python 3.6 or higher installed, create a directory and virtual environment. Then, install the following packages:
pip install django django-grappelliDjango is the web framework that we’re working with in this article. (django-grappelli is an admin panel theme that we’ll briefly cover.)
2. Getting The Project
With the previous packages installed, download the example code from GitHub. Run:
git clone https://github.com/philipkiely/library_records.git cd library_records/library3. Creating a Superuser
Using the following commands, set up your database and create a superuser. The command-line interface will walk you through the process of creating a superuser. Your superuser account will be how you access the admin panel in a moment, so be sure to remember the password you set. Use:
python manage.py migrate python manage.py createsuperuser4. Loading the Data
For our exploration, I created a dataset called a fixture that you can load into the database (more on how to create a fixture at the end of the article). Use the fixture to populate your database before exploring it in the admin panel. Run:
python manage.py loaddata ../fixture.json5. Running The Example Project
Finally, you’re ready to run the example code. To run the server, use the following command:
python manage.py runserverOpen your browser to http://127.0.0.1:8000 to view the project. Note that you are automatically redirected to the admin panel at /admin/. I accomplished that with the following configuration in library/urls.py:
from django.contrib import admin from django.urls import path from records import views urlpatterns = [ path('admin/', admin.site.urls), path('', views.index), ]combined with the following simple redirect in records/views.py:
from django.http import HttpResponseRedirect def index(request): return HttpResponseRedirect('/admin/')Using The Admin Panel
We’ve made it! When you load your page, you should see something like the following:
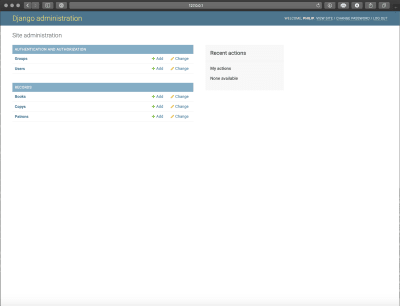
This view is accomplished with the following boilerplate code in records/admin.py:
from django.contrib import admin from .models import Book, Patron, Copy admin.site.register(Book) admin.site.register(Copy) admin.site.register(Patron)This view should give you an initial understanding of the data that the system stores. I’ll remove some of the mystery: Groups and Users are defined by Django and store information and permissions for accounts on the system. You can read more about the User model in an earlier article in this series. Books, Copys, and Patrons are tables in the database that we created when running migrations and populated by loading the fixture. Note that Django naively pluralizes model names by appending an “s,” even in cases like “copys” where it is incorrect spelling.

In our project, a Book is a record with a title, author, publication date, and ISBN (International Standard Book Number). The library maintains a Copy of each Book, or possibly multiple. Each Copy can be checked out by a Patron, or could currently be checked in. A Patron is an extension of the User that records their address and date of birth.
Create, Read, Update, Destroy
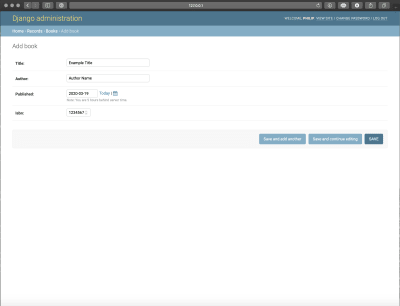
One standard capability of the admin panel is adding instances of each model. Click on “books” to get to the model’s page, and click the “Add Book” button in the upper-right corner. Doing so will pull up a form, which you can fill out and save to create a book.
Creating a Patron reveals another built-in capability of the admin’s create form: you can create the connected model directly from the same form. The screenshot below shows the pop-up that is triggered by the green plus sign to the right of the User drop-down. Thus, you can create both models on the same admin page.
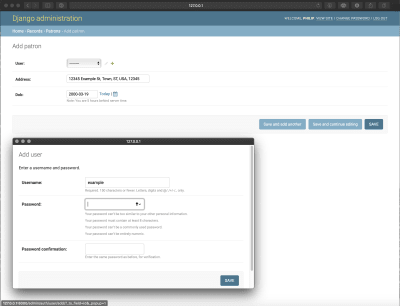
You can create a COPY via the same mechanism.
For each record, you can click the row to edit it using the same form. You can also delete records using an admin action.
Admin Actions
While the built-in capabilities of the admin panel are widely useful, you can create your own tools using admin actions. We’ll create two: one for creating copies of books and one for checking in books that have been returned to the library.
To create a Copy of a Book, go to the URL /admin/records/book/ and use the “Action” dropdown menu to select “Add a copy of book(s)” and then use the checkboxes on the left-hand column of the table to select which book or books to add a copy of to the inventory.
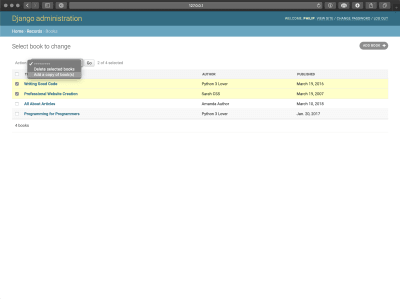
Creating this relies on a model method we’ll cover later. We can call it as an admin action by creating a ModelAdmin class for the Profile model as follows in records/admin.py:
from django.contrib import admin from .models import Book, Patron, Copy class BookAdmin(admin.ModelAdmin): list_display = ("title", "author", "published") actions = ["make_copys"] def make_copys(self, request, queryset): for q in queryset: q.make_copy() self.message_user(request, "copy(s) created") make_copys.short_description = "Add a copy of book(s)" admin.site.register(Book, BookAdmin)The list_display property denotes which fields are used to represent the model in the model’s overview page. The actions property lists admin actions. Our admin action is defined as a function within BookAdmin and takes three arguments: the admin object itself, the request (the actual HTTP request sent by the client), and the queryset (the list of objects whose boxes were checked). We perform the same action on each item in the queryset, then notify the user that the actions have been completed. Every admin action requires a short description so that it can be properly identified in the drop-down menu. Finally, we now add BookAdmin when registering the model.
Writing admin actions for setting properties in bulk is pretty repetitive. Here’s the code for checking in a Copy, note its near equivalence to the previous action.
from django.contrib import admin from .models import Book, Patron, Copy class CopyAdmin(admin.ModelAdmin): actions = ["check_in_copys"] def check_in_copys(self, request, queryset): for q in queryset: q.check_in() self.message_user(request, "copy(s) checked in") check_in_copys.short_description = "Check in copy(s)" admin.site.register(Copy, CopyAdmin)Admin Theme
By default, Django provides fairly simple styles for the admin panel. You can create your own theme or use a third-party theme to give the admin panel a new look. One popular open-source theme is grappelli, which we installed earlier in the article. You can check out the documentation for its full capabilities.
Installing the theme is pretty straightforward, it only requires two lines. First, add grappelli to INSTALLED_APPS as follows in library/settings.py:
INSTALLED_APPS = [ 'grappelli', 'django.contrib.admin', 'django.contrib.auth', 'django.contrib.contenttypes', 'django.contrib.sessions', 'django.contrib.messages', 'django.contrib.staticfiles', 'records', ]Then, adjust library/urls.py:
from django.contrib import admin from django.urls import path, include from records import views urlpatterns = [ path('grappelli/', include('grappelli.urls')), path('admin/', admin.site.urls), path('', views.index), ]With those changes in place, the admin panel should look like the following:
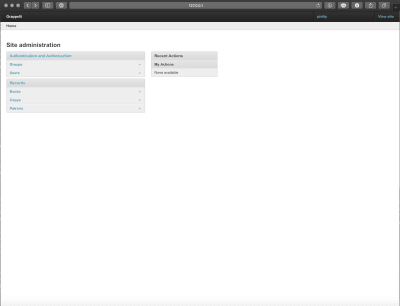
There are a number of other themes out there, and again you can develop your own. I’ll be sticking with the default look for the rest of this article.
Understanding Models
Now that you’re comfortable with the admin panel and using it to navigate the data, let’s take a look at the models that define our database structure. Each model represents one table in a relational database.
A relational database stores data in one or more tables. Each of these tables has a specified column structure, including a primary key (a unique identifier for each element) and one or more columns of values, which are of various types like strings, integers, and dates. Each object stored in the database is represented as a single row. The “relational” part of the name comes from what is arguably the technology’s most important feature: creating relationships between tables. An object (row) can have a one-to-one, one-to-many (foreign key), or many-to-many mapping to rows in other tables. We’ll discuss this further in the examples.
Django, by default, uses SQLite3 for development. SQLite3 is a simple relational database engine and your database is automatically created as db.sqlite3 the first time you run python manage.py migrate. We’ll continue with SQLite3 for this article, but it is not suitable for production use, primarily because overwrites are possible with concurrent users. In production, or when writing a system that you one day intend to deploy, use PostgreSQL or MySQL.
Django uses models to interface with the database. Using part of Django’s ORM, the records/models.py file includes multiple models, which allows for specifying fields, properties, and methods for each object. When creating models, we strive for a “Fat Model” architecture, within reason. That means that as much of the data validation, parsing, processing, business logic, exception handling, edge case resolution, and similar tasks as possible should be handled in the specification of the model itself. Under the hood, Django models are very complex, featureful objects with widely useful default behavior. This makes the “Fat Model” architecture easy to achieve even without writing a substantial amount of code.
Let’s walk through the three models in our sample application. We can’t cover everything, as this is supposed to be an introductory article, not the Django framework’s complete documentation, but I’ll highlight the most important choices I made in constructing these simple models.
The Book class is the most straightforward of the models. Here it is from records/models.py:
from django.db import models class Book(models.Model): title = models.CharField(max_length=300) author = models.CharField(max_length=150) published = models.DateField() isbn = models.IntegerField(unique=True) def __str__(self): return self.title + " by " + self.author def make_copy(self): Copy.objects.create(book=self)All CharField fields require a specified max_length attribute. The conventional length is 150 characters, which I doubled for title in case of very long titles. Of course, there still is an arbitrary limit, which could be exceeded. For unbounded text length, use a TextField. The published field is a DateField. The time the book was published doesn’t matter, but if it did I would use a DateTimeField. Finally, the ISBN is an integer (ISBNs are 10 or 13 digits and thus all fit within the integer’s max value) and we use unique=True as no two books can have the same ISBN, which is then enforced at the database level.
All objects have a method __str__(self) that defines their string representation. We override the default implementation provided by the models.Model class and instead represent books as “title by author” in all places where the model would be represented as a string. Recall that previously we used list_display in Book’s admin object to determine what fields would be shown in the admin panel’s list. If that list_display is not present, the admin list instead shows the string representation of the model, as it does for both Patron and Copy.
Finally, we have a method on Book that we called in its admin action that we wrote earlier. This function creates a Copy that is related to a given instance of a Book in the database.
Moving on to Patron, this model introduces the concept of a one-to-one relationship, in this case with the built-in User model. Check it out from records/models.py:
from django.db import models from django.contrib.auth.models import User class Patron(models.Model): user = models.OneToOneField(User, on_delete=models.CASCADE) address = models.CharField(max_length=150) dob = models.DateField() def __str__(self): return self.user.usernameThe user field is not exactly a bijective function. There CAN be a User instance without an associated Patron instance. However, a User CAN NOT be associated with more than one Patron instance, and a Patron cannot exist without exactly one relation to a user. This is enforced at the database level, and is guaranteed by the on_delete=models.CASCADE specification: if a User instance is deleted, an associated Profile will be deleted.
The other fields and __str__(self) function we’ve seen before. It’s worth noting that you can reach through a one-to-one relation to get attributes, in this case user.username, in a model’s functions.
To expand on the usefulness of database relations, let’s turn our attention to Copy from records/models.py:
from django.db import models class Copy(models.Model): book = models.ForeignKey(Book, on_delete=models.CASCADE) out_to = models.ForeignKey(Patron, blank=True, null=True, on_delete=models.SET_NULL) def __str__(self): has_copy = "checked in" if self.out_to: has_copy = self.out_to.user.username return self.book.title + " -> " + has_copy def check_out(self, p): self.out_to = p self.save() def check_in(self): self.out_to = None self.save() Again, we’ve seen most of this before, so let’s focus on the new stuff: models.ForeignKey. A Copy must be of a single Book, but the library may have multiple Copys of each Book. A Book can exist in the database without the library having a Copy in its catalog, but a Copy cannot exist without an underlying Book.
This complex relationship is expressed with the following line:
book = models.ForeignKey(Book, on_delete=models.CASCADE)The deletion behavior is the same as Patron’s in reference to User.
The relationship between a Copy and a Patron is slightly different. A Copy may be checked out to up to one Patrons, but each Patron can check out as many Copys as the library lets them. However, this is not a permanent relationship, the Copy is sometimes not checked out. Patrons and Copys exist independently from one another in the database; deleting an instance of one should not delete any instance of the other.
This relationship is still a use case for the foreign key, but with different arguments:
out_to = models.ForeignKey(Patron, blank=True, null=True, on_delete=models.SET_NULL) Here, having blank=True allows for forms to accept None as the value for the relation and null=True allows for the column for the Patron relation in Copy’s table in the database accept null as a value. The delete behavior, which would be triggered on a Copy if a Patron instance was deleted while they had that Copy checked out, is to sever the relation while leaving the Copy intact by setting the Patron field to null.
The same field type, models.ForeignKey, can express very different relationships between objects. The one relation that I could not cleanly fit in the example is a many-to-many field, which is like a one-to-one field, except that, as suggested by its name, each instance can be related to many other instances and every other and each of those can be related back to many others, like how a book could have multiple authors, each of whom have written multiple books.
Migrations
You might be wondering how the database knows what is expressed in the model. In my experience, migrations are one of those things that are pretty straightforward until they aren’t, and then they eat your face. Here’s how to keep your mug intact, for beginners: learn about migrations and how to interact with them, but try to avoid making manual edits to the migration files. If you already know what you’re doing, skip this section and keep up what works for you.
Either way, check out the official documentation for a complete treatment of the subject.
Migrations translate changes in a model to changes in database schema. You don’t have to write them yourself, Django creates them with the python manage.py makemigrations command. You should run this command when you create a new model or edit the fields of an existing model, but there is no need to do so when creating or editing model methods. It’s important to note that migrations exist as a chain, each one references the previous one so that it can make error-free edits to the database schema. Thus, if you’re collaborating on a project, it’s important to keep a single consistent migration history in version control. When there are unapplied migrations, run python manage.py migrate to apply them before running the server.
The example project is distributed with a single migration, records/migrations/0001_initial.py. Again, this is automatically generated code that you shouldn’t have to edit, so I won’t copy it in here, but if you want to get a sense of what’s going on behind the scenes go ahead and take a look at it.
Fixtures
Unlike migrations, fixtures are not a common aspect of Django development. I use them to distribute sample data with articles, and have never used them otherwise. However, because we used one earlier, I feel compelled to introduce the topic.
For once, the official documentation is a little slim on the topic. Overall, what you should know is that fixtures are a way of importing and exporting data from your database in a variety of formats, including JSON, which is what I use. This feature mostly exists to help with things like automated testing, and is not a backup system or way to edit data in a live database. Furthermore, fixtures are not updated with migrations, and if you try to apply a fixture to a database with an incompatible schema it will fail.
To generate a fixture for the entire database, run:
python manage.py dumpdata --format json > fixture.json To load a fixture, run:
python manage.py loaddata fixture.json Conclusion
Writing models in Django is a huge topic, and using the admin panel is another. In 3,000 words, I’ve only managed to introduce each. Hopefully, using the admin panel has given you a better interface to explore how models work and relate to each other, leaving you with the confidence to experiment and develop your own relational representations of data.
If you’re looking for an easy place to start, try adding a Librarian model that inherits from User like Profile does. For more of a challenge, try implementing a checkout history for each Copy and/or Patron (there are several ways of accomplishing this one).
Django Highlights is a series introducing important concepts of web development in Django. Each article is written as a stand-alone guide to a facet of Django development intended to help front-end developers and designers reach a deeper understanding of “the other half” of the codebase. These articles are mostly constructed to help you gain an understanding of theory and convention, but contain some code samples which are written in Django 3.0.
Further Reading
You may be interested in the following articles and documentation.
- Django Highlights: User Model
- Django Admin Documentation
- Django Models
- Django Model Field Reference
- Django Migrations
 (dm, yk, il)
Articles on Smashing Magazine — For Web Designers And Developers
