Build Live Emotions Capture App Using Emotions API (Part I)
A few months ago, I stumbled upon the API treasure of Microsoft. It was a jaw dropping moment when I saw more than a dozen Artificial Intelligence based APIs. This treasure has a sci-fi name and is known as Project Oxford which was announced in Build 2015 developer conference in San Francisco.
What is Project Oxford?
As stated on Microsoft’s blog – ‘Project Oxford helps developer to build more intelligent apps’. This project was developed to provide the developer some complex machine learning that is otherwise not possible for a single developer to build due to time and resource constraints. These APIs will add more fun and the wow factor to an app that wasn’t easy before.
The bunch of APIs is currently available for limited free usage in beta stage. It has a limited number of API calls per month, specifically ranging from 5k to 10k calls.
A two-article series will cover all the basics of Project Oxford and Emotions API. In this very first article, we will kick-start with creating an account, code of conduct for developers, our project structure etc.
What has Microsoft cooked for you?
Microsoft provides services under three broad categories namely Vision, Speech and language. We will taste only the Emotions API which comes under the Vision category.
What are we building? Another AlphaGo?
Absolutely not. My aim is to build a web app which will take user’s photos from the web camera and give live emotions as the result. The good part is that we will accomplish this goal purely using client-side. So, the JavaScript and jQuery will be used throughout the project. Be ready to dive into JavaScript jargon.
We will capture photos of the user using a cool HTML5 feature called getUserMedia(). Unfortunately, Google doesn’t honor this cool feature without the secure connection. So, note that this hosted app won’t work on Google Chrome unless hosting is on the HTTPS connection.
Creating an account
Let’s setup an account with Project Oxford.
Unfortunately, you will need a Microsoft account to register. In case, you are already a fanboy of Microsoft then go ahead and sign in.
Generating API Key
w00t, you just created an account. Now, under your profile click on ‘My Subscription’ then on that page click on ‘Request New Keys’. The real use of keys will be covered in the last article. That’s it!
Developer Code of Conduct
As a responsible developer, you must read what are Do’s and Don’ts of Project Oxford APIs. Microsoft has laid down a few guidelines which you must follow otherwise they will terminate access to the Project Oxford APIs. Here are few don’ts in laymans language.
- Your app’s target audience must be above fourteen years.
- Your app must not harass or threaten or violate the fundamental rights of an individual or group.
- Your app must not find, collect, store or publish private or identifiable information of an individual or group without their knowledge and consent.
In our Emotions API, we have especially taken care of the last rule. The good news is that our app doesn’t store photos of the user. So, the user will be willing to use the app without any hesitation or privacy concern.
What’s more for you?
Project Oxford has a dedicated support community where you can post your queries and get answers. Wait! They have a nice demo and documentation for each service too. The documentation is not the pile of contents, rather they are very lucid.
REST(use)ful API
Emotions API allows us to build an application in more than half a dozen languages such as C#, Java, JavaScript, Objective-C, PHP, Python, and Ruby. We are going to use JavaScript for our application, but I would highly encourage you to explore and consider development in server-side languages as well.
Project Dependencies and Structure
We have talked a lot about and covered our app theoretically. It’s time to fold up your sleeves and start something on the machine.

Your first task is to be ready with –
- Development environment (I prefer MAPP for Mac or WAMP server for Windows)
- A nice code editor (I prefer Bracket)
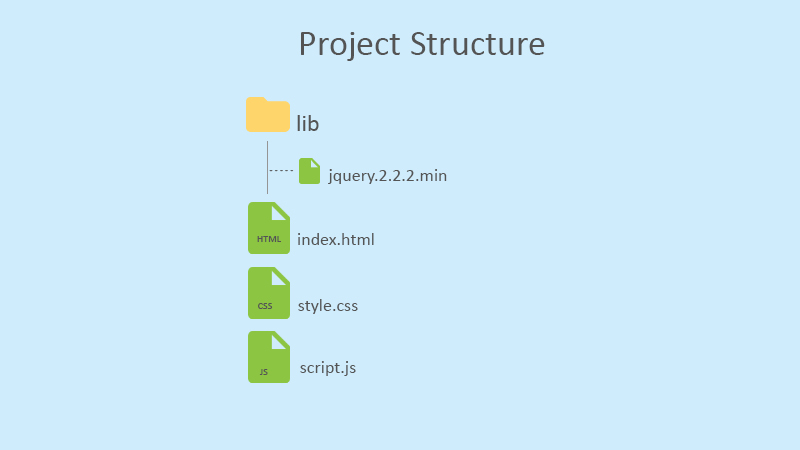
- jQuery library (either call from CDN or download from the official site)
- Strong coffee (As I always say, it’s optional)
You will create three files namely – index.html where we will structure our passable markup for the app, style.css to add meat to our HTML structure and finally script.js to breathe life into our app.
Next week’s glimpse
In the next tutorial, we will write some basic markup and style it. In addition to that, we will also write some code to take user’s photos from the web camera and will convert that photo into a Binary Large object (BLOB) which is real white magic to our app and finally an AJAX call to get result.
See you next week, till then download dependencies and be ready with the file structure.
